Bulletin Board Push Pins From Vintage Buttons And Jewelry
Use vintage buttons or old jewelry to make unique push pins that can double as great handmade gifts (or you might just want to keep them all to yourself!).

Do you have old clip earrings, pins or costume jewelry stashed away somewhere? Me, too – I’ve picked up a lot of old buttons and jewelry over the years, thinking to use them in crafts. While most are very beautiful they really wouldn’t ever be used for their original purpose anymore.
Inspired by cute push pins from a catalog (Ballard, of course…), I went through my stash and quickly made up a few for my bulletin board.

I love how they turned out! These clip-back earrings, bone button with one hole (I can’t figure out how they were sewed on…) and regular buttons were just sitting in a container on a shelf. Now they’re out where they can be enjoyed on a daily basis.
What an upgrade from the standard thumbtack. And of course these pins will make great little gifts and are easy to tailor to the recipient – and how cool is it that it results in rescuing more cast-offs?

Here’s a super easy tutorial, plus a packaging idea for gift-giving:
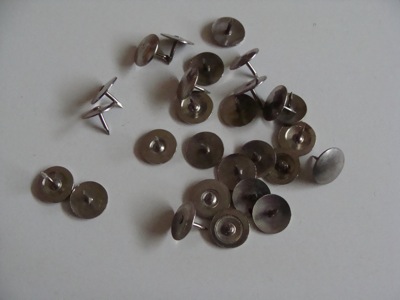
1. This project starts with basic, run-of-the-mill thumb tacks. I had all these items laying around my house for this project, so I’m not sure of the total cost to make them, but it couldn’t be more than a dollar or two.
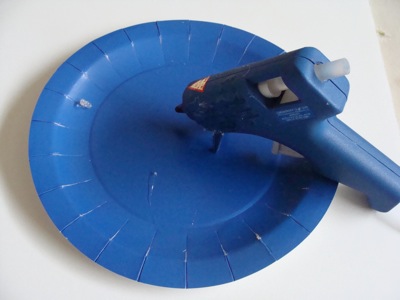
2. Use a glue gun or a stronger adhesive like E6000 to attach the items to the thumbtacks.
The glue gun is quick and easy, and it’s what I used. For most of the items this worked fine though a couple of the jewelry pieces that didn’t have flat backs pulled apart when I used them after drying. But then I found that if I loaded up the glue, and made sure to go around the edges of the tacks with glue, then it worked fine and I could pull one off the corkboard without it coming apart.
Tube adhesives like E6000 take longer to dry and then there’s the hassle of figuring out how to keep them from slipping while the glue dries, but the bond is more permanent. It’s your choice.

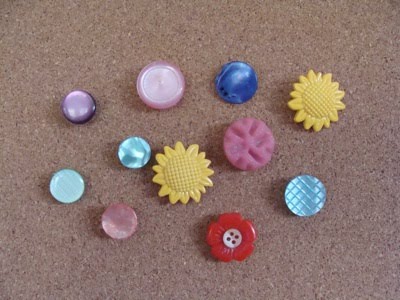
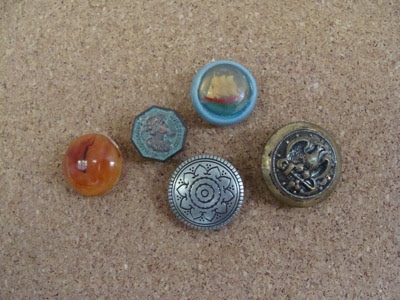
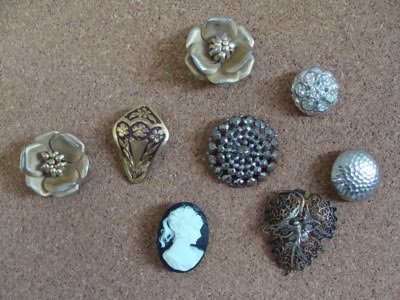
3. Gather your buttons and jewelry.
- You’ll want to use ones that don’t have holes in them, but have shanks on the backs for attaching to garments (for the most part- you can use buttons with holes if you layer another button on top).
- Think about the recipients age, decor, and what they like.

- Search for old jewelry that will lie flat against the board. These were all broken, but I’ve used clip-on earrings by just pulling the clip off the backs- they come off pretty easy.

4. Use metal nippers to snip off the shanks on the backs of the buttons that have them (is that what this tool is called? That’s what we’ve always called them…).
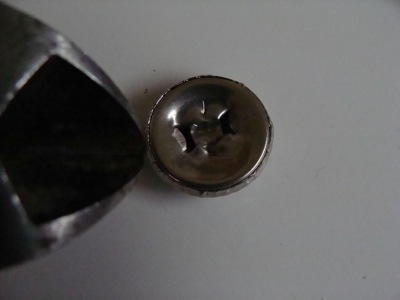
- Some metal buttons just sort of “pooch” out (I’m so technical, huh?) so you’ll want to flatten those by using the nips to push the metal inwards to the front of the button.

5. Attach the tacks with your choice of hot glue or a tube adhesive like E6000.
And that’s it! How easy is that?
Here are some ideas for gift-giving:
- A colorful set for a girl’s bedroom.
- A masculine set for a son, brother, or husband.
- Any mom, sister, or friend with a bulletin board would like these lovely jewelry pins – they are so much nicer than those plastic pins.

Here is a very simple way to package them to present as a gift:

- Cut a small piece of foam board that fits into a small cellophane bag (this is a candy/treat bag).
- Push the pins gently into the foam board (not all the way- just enough to hold them) and slip into the bag.
- Printed out “Bulletin Board Push Pins” on parchment paper
- Fold it in half and then over the top of the bag
- Punch two holes through all the layers and thread a short piece of ribbon through, knotting it to keep it closed.
You could just staple it closed as well. Or simply draw the cellophane together with ribbon and attach a tag.
Simple. Creative. Frugal. Using what you have.
Oh yes, this is a “cottage” thing for sure!
–Jami
Want to save this?
Enter your email below and you'll get it straight to your inbox. Plus you'll get easy new recipes, gardening tips & more every week!

Bulletin Board Push Pins from Vintage Buttons and Jewelry
Tools
- Hot glue gun
- Small Metal Wire Cutters (Optional)
Materials
- Buttons and small pieces of jewelry You’ll want to use ones that don’t have holes in them, but have shanks on the backs for attaching to garments (for the most part- you can use buttons with holes if you layer another button on top).
- Metal thumb tacks
- Hot Glue or a stronger adhesive like E6000
Instructions
- Use a glue gun or a stronger adhesive like E6000 to attach the items to the thumbtacks
- Gather your buttons and jewelry
- Use wire cutters/metal nippers to snip off the shanks on the backs of the buttons that have them
- Attach the tacks with your choice of hot glue or a tube adhesive like E6000
Notes
- Cut a small piece of foam board that fits into a small cellophane bag (this is a candy/treat bag).
- Push the pins gently into the foam board (not all the way- just enough to hold them) and slip into the bag.
- Printed out “Bulletin Board Push Pins” on parchment paper
- Fold it in half and then over the top of the bag
- Punch two holes through all the layers and thread a short piece of ribbon through, knotting it to keep it closed.
This is linked to:
It’s a Hodgepodge Friday
Favorite Things Friday
Regarding buttons with one hole: i have a skirt with bone buttons. they used a seed bead. Like this: thread up through the back of the button, thread through the seed bead. Then back through the button from the top to bottom. Very elegant! Maybe this could be used with your bulletin board pins, although it would have to be adapted and maybe not worth farting around with. Thanks for another cool idea!
Ah, I’ve always wondered how that worked! I used ribbon once to use them on a pillow and knotted it to hold them but they do eventually fall off. Using a bead that couldn’t work itself out is the key it seems. Thanks! I think that would look great on a pillow or something – I’ll have to figure out where I can do that. 🙂
I love this idea! These would make great gifts!
Great pins. I just picked up some vintage earrings and I’m going to be making some into push pins.
You can also glue these to magnets to make pretty refrigerator magnets.
Therese
Love these push pins and as a sewing woman, I have a ton of buttons. What a great way to get to see them all the time instead of them sitting in the button jar! Love it. TFS. Donna
Very creative, Jami! If I ever get around to making that fabric-covered bulletin board I’ve been wanting to do, I’ll definitely be borrowing this idea.
Erin
They are beautiful.