Original Brown Paper Floor Tutorial: A DIY Alternative to Wood Floors
Welcome to one of our most popular DIY’s at AOC! This unique brown paper floor technique has been pinned and viewed on YouTube more than a million times and was even featured in an issue of Cottages and Bungalows! It’s a doable DIY that anyone can do and results in a leather-look flooring that lasts a surprisingly long time.
Below you’ll find a bit more about the technique, the video tutorial we made that shows all the steps needed to create this floor using brown kraft paper and glue, and a supplies list.

Some links in this article are affiliate links and if you click on them and purchase I will receive a small commission at no cost to you.
UPDATE: Check out the definitive FAQ for the Paper Floor Technique where we answer all the many questions we get about this cool brown paper floor solution to nasty carpet!
UPDATE #2: See our Brown Paper Floor Follow Up: How Do They Look 4 Years Later? video.
Wondering what the heck a paper floor is and if it’s really doable? It is a really cool, unique flooring method (which is basically decoupage) that I first created in our first house, a 1940 Portland bungalow.
We applied it to the stairs going up to a half story and all the floors in the upstairs, both an office and guest room-studio. I thought it would be temporary, but we were shocked how well it lasted, even on the stairs, and how much we liked it. We had no problem selling the house 5 years after laying for flooring – and the new owners thought it was really cool!
After moving to our 1980’s ranch, we knew we’d use the floor again to get rid of the old carpet, which we did for both our son’s room makeover and our daughter’s recent room makeover.
It’s been such a great alternative to expensive wood floors, creating a cool leather look while still giving the feel (decor wise) and easy upkeep of wood.
What’s wrong with carpet?
Brian and I are unanimous in our love of wood flooring and our hatred disgust dislike of carpet. Bear with me a minute as I get on a little soap box about wall-to-wall carpet.
Carpet is:
- expensive
- not an easy DIY project (more money for labor)
- hard to clean (pets? children?…hello?)
- “filter is full after 5 years” (exact quote from a carpet professional- translation: there’s no amount of cleaning that’s going to get it clean)
- dusty, dirty edges even with regular vacuuming
- an unchangeable color
- not great for certain allergies
- and, since we moved rurally, shows all of the dirt, mud and other dark things that routinely come in on people’s shoes…
OK, I’m down from the box and obviously you can guess where we stand. And while I know plenty of people who love their wall-to-wall, this video tutorial is for those like us who’d like to get rid of it, either because you can’t afford new or because you, too, don’t like carpet.
Needless to say, we are slowly getting rid of all the carpet that came in our ranch-turned-cottage and we are down to two rooms left: the master bedroom and the sunken living room. They will probably get some sort of wood, but for the kid’s rooms, we used this decoupage torn-paper technique we’re sharing with you that we’d used in our Portland bungalow with great success.
Wait? Really, a paper floor?
Yes! We love the doable DIY aspect of this as well as the look and the cost. It is easy, inexpensive and creates a (sort of) leather-look with minimal effort.
Does it last?
It’s coated with water based polyurethane so it has worn really well in the rooms we’ve used it, although I wouldn’t recommend it for high traffic areas.
How much does it cost?
How inexpensive is it? A 12′ x 11′ room cost just $65 total, or about .50 a square foot, which is actually amazing for new flooring.
Brown Paper Floor
Here’s what it looks like in our daughter’s room:
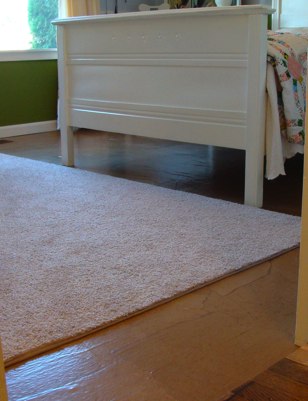
I love seeing this from the hallway now instead of the brown, stained carpeting. It looks a lot airier, too, and makes the room seem bigger.

Now we can get any color of carpeting we like and when it’s old and stained we can just buy a new one (and since this was just $25, it’s not a huge investment).

Here you can better see what the floor looks like. The pieces of torn kraft paper all came from the same roll, but they dry light and dark (I don’t know why), which I think creates a more interesting look than if it was all one color.
You can also see more of the finished floor in this follow up video.
Brown Paper Floor Tutorial Video
Interested in replicating this flooring option in your house? This tutorial video shows you all the steps and tools you’ll need, plus I’ve created a list of tools and supplies after the video:
Brown Paper Floor Supplies
Floor Preparation
- Wood filler for any gaps or holes in subfloor.
- Sanding paper for rough areas and edges.
Applying The Paper
Brown “Builder’s Paper” – the 140-foot roll covered a 12×11′ bedroom and a 11×11′ for us:
- Amazon: Easy Mask 35-inch x 140-feet Brown Builders Paper
- Home Depot (where we get ours): Trimaco Easy Mask 2.9-ft x 140-ft Builder’s Paper
Gallon Size Glue – one gallon covers a 11’x11′ or 12′ room:
Other Tools:
- Small bucket and stir stick
- 3-inch paint brush
- scissors
- trash can
- container to hold water
Optional Staining
This step isn’t in the video, but would happen after the glue dries but before you apply the polyurethane. See FAQs for more on staining; note that I don’t recommend oil based stains like the examples since everything else is water based:
Water based stain in a color you’d like. Here are two options:
Application:
- 9-inch pad applicator (to work with an extension pole)
- For edges use disposable chip brushes or 2-inch foam brushes
- Disposable gloves
Polyurethane Coating The Paper Floor
Floor Grade Water Based Polyurethane – 1 gallon for a 10×10′ to 10×12′ room will give about 5 coats:
- Amazon: Minwax Polycrylic Water-Based Protective Clear Finish, Satin, or Varathane brand for floors in a single pack
- Home Depot: Varathane Satin Water-Based Floor Polyurethane (pack of 2)
To apply poly with a brush like I show in the video:
- 4-inch brush (attached with duct tape to a long PVC pipe pole)
To apply poly with a painter pad on a pole:
To apply poly with a roller (use only foam to minimize shedding and bubbles – these weren’t available when I first did the floors):
- 9-inch foam roller (attach to a roller with an extension pole)
- Extension Pole
Paper Floor Testimonials
Kee Kee 1/2019
Anyway, thank you sooooo much for sharing this flooring with the world. I am absolutely in love with the look, low maintenance, durability, and cleanliness of it. When we pulled up the Lumber Liquidators laminate flooring, I was absolutely disgusted by the what was underneath. The mildew and whatnot that was able to get through the crevices and fester. Yuck. The seamlessness of this flooring means I never have to worry about that. Thank you, thank you, thank you.
Dee 5/2019
I did this technique about 13 years ago in a bathroom – still holding up Haven’t even needed to repoly. Insane
I added stain to my glue mix and I also did over vinyl . No problems . I did small pieces of paper , crinkled . Love It 13years!!! poly poly poly poly ! It looks amazing! And it is a heavily traffic area – our laundry in there also. Simply amazing.
Please let us know if you use the technique- we’d love to hear (and see!) how it turned out for you!
This tutorial has been updated – it was originally published in August of 2010.
Disclosure: affiliate links in this article will earn commission based on sales, but it doesn’t change your price. Click here to read my full disclaimer and advertising disclosure.
I’m about to try this technique my slumlord won’t fix floors after sewage back up I’m excited!!
Sorry about your situation – I hope this helps!
I’m considering trying this in my home office to get rid of the carpet. I’ve been told by someone who knows a bit of the history of the house that there is ugly ceramic tile underneath. Do you know if it’s possible to lay the paper bag floors over cermaic tile?
A number of people have told me they have done it, though I don’t have examples. I’ve always suggested trying a small area first just to see how the grout lines come out in the paper. The other thing would be to fill in the grout lines if possible. That’s the only thing that’s an issue, otherwise the glue and paper should stick to the tile as others have told me.
Has anyone had long term success with paper flooring in a kitchen? My landlord won’t replace the awful burnt and worn vinyl flooring because they will renovate the place once I leave. I need something that makes me feel happy to be in my kitchen!
There are quite a few comments on this, so you may not have seen, but there are some who’ve done this technique in bathrooms, kitchens, and even whole houses! I think for your situation it may be perfect – you can always add a small patch and cover with more poly if there is a wear, but that would be years after applying, I’d think. Make sure you put enough poly on to protect the water from paper spills and you should be good to go!
Hi
Does anybody know if you can use this technique ( brown paper bag) on top of clean wooden floor boards.
Yes, but the floor needs to be one that doesn’t move or have too big of cracks, as that will cause the paper to crack.
has anyone ever tried drawtite? I have seen it mentioned as a sealer after the glue in a cou0ple of forums.
Hmm, this is the first I’ve heard of that, Sara!
I did some samples and even before staining my pieces came out a very dark brown. I am not sure why. Same exact paper option as you recommend. Any thoughts?
After doing this numerous times I’ve learned that the paper can react differently – depending on the source of their materials or the processing, maybe?
If you like it that color, maybe you can skip the staining and it will be that much easier. 🙂
I am redoing a downstairs family room that I have pulled up indoor/outdoor carpet glued down on concrete. I love this idea. Would it work on concrete??
I have info on using with concrete in the FAQs for this project here: https://anoregoncottage.com/brown-paper-floor-technique-faqs/
So… basically DECOUPAGE. we did this back in the 1960’s
great idea!
Yes. 🙂
We are in the middle of this project and most of it looks great! Our German Shepard ran across the floor and tore a few sections I would like to fix the areas he damaged. Would you recommend gluing a new piece of paper over the damage? Or would it be better to use poly to affix the new piece of paper over the damage? Thanks so much for this tutorial!
If you have poly down, then use it to glue the new piece on. If it’s only glue, you can use watered down glue like you did with the original piece. Does that make sense?
It does thank you again for the help with this project!
When the people stained the floor after it was installed, prior to clear coating it, did they have a problem with the stain taking hold because of the glue that was used?
I don’t think so, Bill. I have at least one of those linked in the FAQ page – have you seen it?
I had the same problem Bill. When the Elmer’s glue dried, it was like a coat of poly all on its own. When I attempted to apply the stain, it just wiped off. I don’t know how Rachael of LovelyCraftyHome.com — the link in Jami’s FAQ about staining — pulls it off. I ended up following Jami’s lead and left it the natural color. Happy I did! I imagine tinting either the glue mixture or the poly — probably the glue because that’s actually staining the wrinkled paper — is the way to go,
I ended up using some smoothpaper pieces mixed in with the wrinkled for an interesting contrast, and some as long as five feet and as wide as three. I kept thinking about tectonic plates the whole time and am thinking of making a circular map of the globe in the middle of my living room.
Thanks for the inspiration, Jami!
John
Your floor sounds great, John – glad that worked for you!
I’ve actually never tried staining it, so I can’t help with that – I’ve always liked the brown color and glad you did, too.
I am interested on trying this on a slate floor that is brown. The floor is uneven as the slate pieces were set in cement. Do you think this would work? Also I need a color paper(blue) to work with. Do you know where I might be able to find color paper? I did my stairs several years back with the brown paper and it still looks great.
I don’t think it would look good on slate tiles, Fran. There are too many variations and you wouldn’t want movement in there at all. I’m not sure where you’d find color paper – I’d just start googling it to see what comes up!
What a marvelous idea! I used to do a lot of decoupage and one of my favorite projects was a chair with the theme, We’ll Always Have Paris. bit.ly/3OJXFJv But I never even considered decoupaging the floor! Question: How many layers of torn paper did you apply? I was planning to tile my bathroom floor but now I’m thinking I could get a similar effect by decoupaging scrapbook paper to the floor–that is unless I would need to build up layers prior to applying the polyurethane. By the way, I found your blog when looking for inspiration for bathroom vanity ideas since I haven’t been able to find what I want at a price I’m willing to pay. I love your vanity. Thanks, for the great ideas!
Thank you! It’s just one layer of paper (except for the parts that overlap) and multiple layers of the polyurethane.
And I love using dressers or cabinets for vanities – so much character at a fraction of the price!
I plan to use this technique in my basement rooms that are rarely utilized. Concrete slab floor, of course. I recall.you mentoned the issues you had in your master bedroom were due to oil based sealant and heavier kraft paper. Do you recall the preferred paper weight? I have found various weights online – I hope to avoid the issues you endured.
If you’re doing this on concrete, then you’ll want to use the different technique I link to in the FAQ page. Unfortunately, I don’t know the pound weights, I just have gotten the “builders paper” they sell at Home Depot. It basically should feel like brown grocery bag weight.
Hope this makes your basement look amazing!
Hi
I want to do the paper floor in my home and just saw your YouTube video and update. Where you state is four years later. Can you tell me how long has it been since the update do you still have the floors and would you recommend for hallway or stairs???
We actually did this floor in our first house – a city bungalow – before blogging and it lasted for years, even on stairs! In low traffic areas, this will last 10 or more years. If the leg of a piece of furniture gouged it, it was easy to replace that area with new paper and poly (you “glue” it with the poly, though – no adding glue/water after the fact).
Hi guys! I wish I’d seen your video on Kraft Paper Floors before I started this project – nice work! As it was, I got information from various sources on the internet and did a lot of experimentation. I decided to document the process on an Instructiable. Here’s a link:
https://www.instructables.com/id/Kraft-Paper-Floor/
I was like you, I HATED my crummy old wall-to-wall carpet but I wasn’t prepared to install hardwood at the time. Once I realized that it could be covered over, it was full steam ahead. I’m encouraged to hear that the buyers of your home liked the treatment as this is something I worried about. Three years later, though, I still love it and it’s holding up extremely well, even on the stairs which are the only entrance to my home.
Cheers!
Vox DeVaux
I looked at your project, Vox, and your floors look great! The circles were an interesting riff on the technique. It’s fun to see what others come up with – thanks for sharing!
Could you do this technique over OSB board? If so, would you use the Elmers Glue All to put it down?
I don’t see why not. I’d just use the glue like we do with particle board. You can do a test for sure. If it looks like it soaks up too much, you can glue it down with the poly like people do who put it on cement. It works just as good, just more expensive.
Interested in doing this on stairs. Would you still use big pieces and wrap the stair and tread or would you use straight edge on both stair and tread?
When I did the stairs in our Portland bungalow, I used the paper only on the tread (the top of each stair) and painted the risers white. I wrapped the paper around the rounded tread edges, with straight edges against the risers. I used medium sized papers, set the straight edge against the riser and wrapped it up and around the lip, finishing the whole tread with straight edges at the back riser.
Hopefully that makes sense!