French Bench Makeover {Using Drop Cloth And A Sharpie}


I’m happy to report that another project from my unfinished project list is checked off! This happened to be probably the easiest one of all and turned out to be really fun.
Remember this French-style bench I found at a local thrift store:

This style is actually hard to find here where we live, so when I saw it I snapped it up and paid more than I normally do for thrift store items – $40.00.
I went through a lot of ideas as it sat in my workroom: Should I go with a bright fabric? Use a transfer method on plain fabric? I even thought about making a fabric from upholstery webbing – until I saw the price of webbing…gah! I thought it would be cheap.
And then I got tired of looking at it. I found some fabric in a Ballard’s catalog with French writing and, since I only needed a yard, was all set to pay $24.99 for it.
But I had paid $40 already…and I did have a piece of painter’s drop cloth left over from another project, so I thought, “why don’t I just write something on it that’s meaningful to me rather than something I can’t read?”

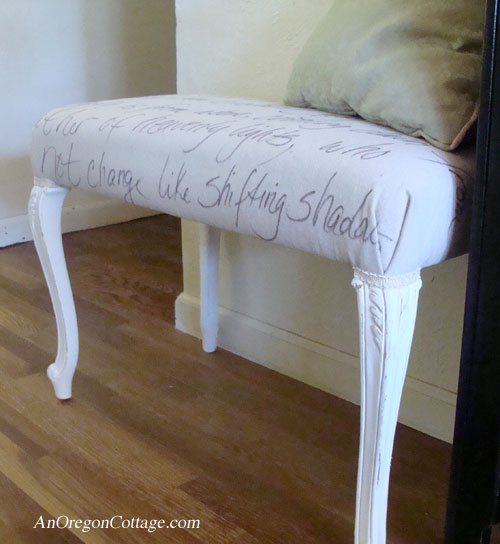
So I grabbed a Sharpie and wrote a favorite verse on the piece of drop cloth. I purposely filled the fabric, knowing that some of the words wouldn’t show after upholstering the bench, because I wanted it to look like printed fabric.
I also didn’t care about perfection – I didn’t make sure the sentences were straight and I just wrote in my best flowy script – which isn’t artistic to say the least. But I love how it turned out – it’s personal and meaningful.
Here are the steps I took to transform this thrift-store bench with my Sharpie marker fabric:

1. Remove the staples holding any fabric that can’t stay. This bench had a black fabric covering the bottom that was torn, so it needed to come off. The original fabric, however, was in good shape, didn’t smell, and wouldn’t show through the canvas drop cloth, so I left it on.
2. Remove edging material. Since the piping was glued and stapled, I found a pair of pliers worked best to pull it off.
3. Paint the legs. Two coats of semi-gloss enamel that I already had covered the rough wood finish (I didn’t bother with a primer). After drying completely, I lightly distressed the legs with a sanding block. I don’t like a lot of distressing – just enough so that when it gets chipped, it looks like it was supposed to be like that. {wink}
4. {not pictured} Center the fabric piece over the bench (making sure there’s an even amount of fabric all around), flip it over and use a staple gun to secure the fabric in the center of all four sides. Start with a couple of staples on the first long side, pull the fabric tight to the opposite side and secure with a couple more staples. Repeat with the short sides. Tip: Make sure the fabric is as tight as possible to achieve a professional look.

5. Set the bench back on it’s legs and make a pleat on one corner, centering it over the middle of the leg. Make it as tight and even as you can and put one or two staples in the pleat to hold it.
6. Flip the bench again and carefully trim the fabric close to the inside of the leg, making sure to leave enough to staple.
7. Trim the fabric as close the the top of the leg as possible, below the first staple. I found it easiest to do this with the bench flipped back on it’s legs again.
Yes, there’s a lot of flipping with this project.

8. Staple all the way around the front of the leg, securing the fabric into the wood. Repeat with the remaining legs.
9. With the bench on it’s back (last time – honest!), finish stapling all the edges, including around each leg.
10. Hot glue gimp, cording, or covered piping around the top of each leg to conceal the staples.
Ta-da, that’s it! Why do I put these things off for so long?
I love it in our entry, that it says something meaningful to us, and that I used what I had. Which makes me feel a whole lot better about paying 40 bucks for it.
And if I get tired of it, I know how quick and easy it is to transform now.
This is linked to:
Furniture Feature Friday, Saturday Nite Special, Weekend Wrap-Up, and Thrifty Treasures.