5 Tips To Transition A Kid Room To A Teen Room
How to update and transition a kid room to a teen room they’ll love!

There comes a time in your child’s life when you are faced with the moment you’ve been dreading anticipating preparing for: your little baby is a preteen or teenager who has outgrown that little kid room you always thought was so cute. It happens in every child’s life – they want their room to reflect them and their interests.
When our kids reached this milestone, however, we did not have a budget that allowed them to just pick out all their favorite things from a PB Teen catalog. But by using simple DIY projects, organizing, and buying some key items, we were able to upgrade them into affordable young adult rooms.
Below are the five tips (plus a bonus idea) to transition a kids room to a teen room that we learned along the way.
1. Consult with your teen…or not
Each child is different and while the room should reflect them, not all kids care about decorating.
- Our son, for example is supremely uninterested in paint and colors (he’s color-blind, too!), though I knew he’d appreciate a more “grown-up” room. I asked him a few key desires (a bigger bed was his #1 request) and then we surprised him with an “Extreme Room Makeover” when he returned from a spring break trip.
- Never in a million years would I attempt to surprise our daughter, however. She has definite opinions about everything (I hardly ever buy her clothes, even, without her input). She picked out the colors, fabric, and helped flesh out the ideas before we made over her room while she was away. She still got the fun of seeing it done like her brother, but it was exactly what she wanted, too.
2. Clean out the clutter

Stuffed animals, toys, figurines, children’s books, old clothes, things that were special years ago and aren’t anymore – these are all things that need to be dealt with.
Use the classic “three boxes” organizing technique (which I’ve expanded to four) to make this part easy:
- Box #1 is labeled “Donate” for your nearest thrift store.
- Box #2 (actually a nice plastic box with a tight-fitting lid) is labeled “____’s Memory Box” and contains any special items your child wants to keep and archive. Our kids kept things from school, special artwork (NOT all artwork from school is special, folks – let’s be realistic here), cards and such. I helped my kids with this – some things I knew would be special later that they didn’t think so and visa versa. The boxes are kept in the attic.
- Box #3 is optional for any younger family members who would benefit from hand-me-downs and toys. I have nieces and nephews that we saved some things for (especially nice picture books and clothes).
- Box #4 is the throw away box, aka, trash can. And, goodness, was there a lot of that!
3. Eliminate what isn’t working
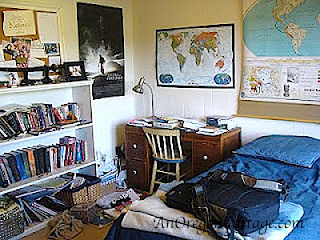
You can see, our son only used his desk to pile junk on. I don’t think I ever saw him sitting at that desk in the five years he had it. Oh, and the drawers? Yeah, I think he used them instead of a trash can. So…no desk and no big drawers to fill with junk.
A skirted bedside table didn’t work, either. It collected dust that was hard to clean and didn’t provide any storage for the things he did use.
This table we upgraded him to has worked much better:
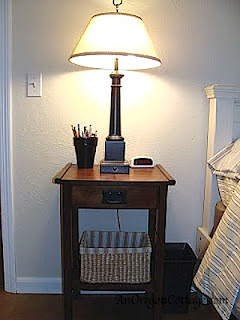
The drawer is just big enough for little things (wallet, games, cards), but not so big that it could double for a trash can. The basket holds the books and papers that used to litter the floor.
Well, things still litter the floor every now and then- but there is a basket to throw them in now.
So ELIMINATE what doesn’t work and brainstorm what will help your child be more organized.
4. Freshen with paint

Wall Before

Wall After
It’s a wonder, really, what a $25 can of paint can do.
Our daughter had painted the flowers on the lower section of her walls when she was about 11 years old. She liked it for awhile and then outgrew it. We took pictures of her favorite parts of the wall and then she picked out the green color to paint over it (she actually found it on the cover of a book which we took in to have color-matched).
Yes, it was bittersweet to paint over it, but you have to admit, it really does “grow up” her room. And she loved it.
5. Provide some adult accessories
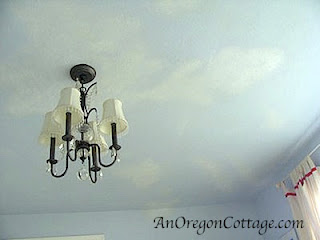
Besides adult-type bedding (no more cartoon-themed sheets *sniff*), think about nice lamps – and even a chandelier.

Provide a comfy chair with a lamp for a special reading area.
And I’ve found that baskets are terrific for hiding that paper clutter that seems to over-take kid’s rooms after awhile. When the baskets get full, it’s time to go through them – much better than piles on the floor!
I also made sure that each room had a large bulletin board where the kids can hang up things important to them – without thumb tacking them all over the walls.
Bonus: Bigger Bed
If their #1 wish is a bigger bed – find a way to provide it!
We adapted a vinage double bed to fit a modern mattress for our daughter and we made a double bed for our son’s room using mostly wood from our scrap pile…and lots of wood fill and paint. I love how paint covers a multitude of imperfections!
What ways have you found to help your child’s room grow up?
Can you provide some instructions on how you made the bed? It looks you made a really nice one!
My husband, Brian, just used a bunch of scrap lumber and diy techniques and didn’t write it down or take step-by-step photos. Wish he had, but hindsight’s 20-20, isn’t it? Sorry I can’t be more helpful, but I do know that Ana White’s site has lots of plans for wood furniture and there may be something similar. 🙂
i wonder if you have any suggestions for shared rooms? my oldest is 8 and she shares her room with 5 yo and 4 yo sisters. there is no other room for her to call her own… and space is at a premium, there is truly only room to walk around the bed… they have a bunk bed with a trundle. unless the Lord miraculously provides a house with more bedrooms, this is how it will be when she is a teenager….
Hmmm, that’s a tough one for sure.
I think providing as much space that’s hers is all you can do right now (which goes for each girl, as well). The bed, of course, plus a wall or portion of a wall that’s just hers to decorate – each girl could have their own bulletin board with a large letter above it that their name starts with.
Talk with all of them about colors and have each decide on “color” – but three that look good together, like pink, green, and blue or yellow (or orange, red, yellow – start with their favs and try to coord). Then their beds will have solid covers in their colors with fun pillows they like, their initial over the bulletin board will be “their” color, etc. Same for their dressers. If there’s a way to have a reading light for each (sconces attached to the wall for each bunk, and bedside light for trundle), it would go a long way to giving them a special spot to cuddle and read that is theirs alone.
Hope that’s not too much – I just started writing whatever came into my head. 🙂
I just did this with my almost 11 year old daughter’s room… she allowed me to keep one thing from her childhood visibly present in the room — the cinderella switch plate. 🙂 Bittersweet!
Well that is so nice!! I just made all the little kid things into a more grown up thing for my daughter!! like XO book holders onto a self. Take her childhood bows and make them into bigger more bolder bows then, get the first letter of her/himself name put ribbon on the bottom and hang it and put all the bows on!! There you have it!! Thanks!!
I need to tackle my oldest son’s room. Your before photo looks familiar–why to they like piles everywhere? I love the results you got. (I’m sharing this on facebook.)