
How To Dry Plums (Not Your Mother’s Prunes!)
Learn how to dry plums that definitely DO NOT taste or feel like typical store bought prunes. Our family can’t get enough of these chewy-tart delicious snacks – and they are healthy for bones, too!
Some links in this article are affiliate links and if you click on them I will receive a small commission at no cost to you.
Of all the fruits I preserve, whether by freezing, canning, or drying, dried plums are my absolute favorite.
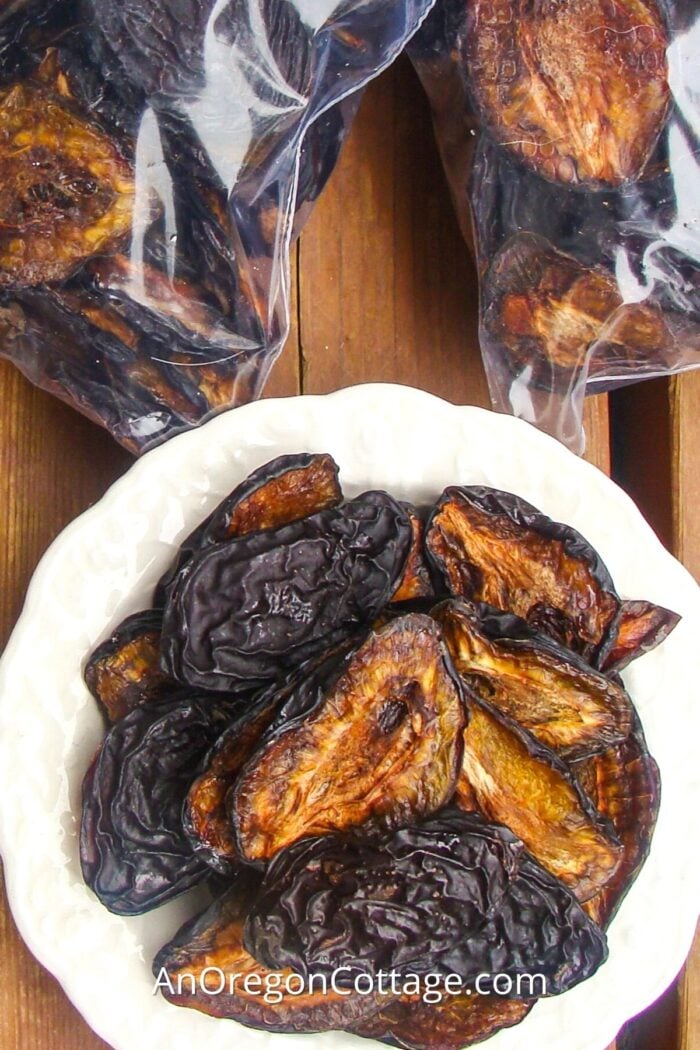
While the dried plums might not look like much, they have a wonderful sweet-tart flavor with a nice chewy (not wet) texture that makes a perfect snack that my kids have loved as much as I do.
Oh, I know what you’re thinking, “Is she talking about prunes?”
Um, not really.
All I can say is that while they are technically prunes, they are also NOT prunes – not the store-bought prunes we all think of.
They don’t have that off-putting wet, squishy texture, smell, or that distinctive prune-like flavor.
Everyone who tastes them agrees, too – these are not like store-bought prunes.
(And I don’t care that the companies who make prunes got together a few years ago and decided to call prunes “dried plums.” The dried plums I make don’t taste anything like their packaged product, so I still call their product prunes!)
The Surprising Health Benefits of Dried Plums
Dried plums are a good source of fiber, antioxidants, and contain psyllium for digestive health, among other things.
But more important than those benefits are the current studies that have shown that eating dried plums daily can have an impact on bone health.
I was so excited when I learned this since I loved them already – well, my version that is!
And if that weren’t enough, there are even a few studies that have indicated that they may even reverse bone loss – which is kind of amazing.
Bring on all the dried plums!

Which plums make the best dried plums?
I think all plums will make a better dried plum at home since you’re able to dry them to reach a firmer product.
But that sweet-tart flavor I love comes from Italian/European “prune” plums which are naturally drier and more tart than traditional round plums (also Damson plums, which are a bit tarter, but we still love).
These plums are an elongated rather than round plum and are usually a purple color.
When you dry these European style plums to a still pliable, yet fully dry, stage they are like small pieces of fruit leather.
Some people may think they look odd (my teenage daughter’s friends would all comment on how they looked – and not in a good way, lol), but they are packed with wonderful flavor.
Drying plums is also one of the easiest preservation methods there is.
I can fill a food dehydrator in about half an hour and then it’s a matter of checking, turning, and bagging the plums as they dry over the next 10 or so hours.
The hands-on time is ridiculously minimal.
How to Dry Plums

Supplies Needed
- Italian/European Style Plums (sometimes called “prune plums”) – though you can use regular plums, too – see FAQ below for more details.
- Cutting Board – I use an over-the-sink cutting board exclusively for this and other preserving tasks as any juice goes into the sink and any pits or seeds are easily moved to a bowl below.
- Sharp Knife
- Electric Dehydrator – I use an Excalibur model that’s no longer available – this is the current 5-tray model (for an oven option, see the FAQ section)

Easy Steps to Dry Plums
1. After washing, slice the plums in half all the way around the pit.
2. Grab each half of a plum and twist gently to separate the halves. Remove and discard the pit.

3. Place halves cut side down on the dehydrator tray.
You can place them cut-side up for less sticking if you want, but I can fit more in my dehydrator with cut sides down. The sides also don’t shrink together with gives me a flatter product that’s easier to store.
It’s OK to pack them close together.

4. Dry according to manufacturer’s recommendations (I use an Excalibur dehydrator which I run at the maximum temperature of 145 degrees).
Depending on the size of the plums, start checking them in 4 to 6 hours, turning trays as needed for even dehydrating.
Once they are looking more dry, flip them over to complete drying (they’ll release from the trays the drier they are – leave them if they are too moist).
Check every 2 hours, removing and packaging up any that are fully dry – showing NO moisture when touched, but are still pliable- and leaving the rest to complete drying.
PRO TIP: If your plums have been drying for only a few hours before it’s bedtime, it’s fine to leave them to dry all night (you can lower the temperature if you aren’t sure). If they’ve been drying most of the day but aren’t done yet, just turn the dryer off for the night, check the plums in the morning, remove any fully dried plums and then continue drying.

Storing Your Dried Plums
When fully dried (see tip below if you’re unsure), pack the plums in glass jars or freezer baggies (using the straw trick to remove as much air as possible).
You have a couple of options on where to store them:
- In a cool damp area at room temperature. I store my baggies in our cupboards and have never had a problem with them molding, probably because we really prefer them on the drier side.
- In the freezer. My brother-in-law (who first introduced me to dried Italian plums) doesn’t dry his as long as I do, so he stores his in the freezer, just to be sure. He will eat them straight from the freezer and then leaves the bag to thaw at room temperature to eat the rest.
TIP: How to Test to See if Fruit is Dry Enough for Room Temperature Storage:
If you’re in doubt as to how dry your plums are, a good test is to package a sample of your dried fruit and leave the jar or baggie on the counter for a day or so – if there is any condensation at all, the fruit was not dried completely.
Then you can choose to dry them more or freeze them for longer storage.
Dried plums will easily last up to a year and maybe more. But to be honest, that just doesn’t happen in our house.
Each year I try to dry more plums than ever in an effort to have them longer than two to four months and we usually eat the last dried plum by May or June at the latest (but that’s only because we’re now empty nesters – when the kids were home we were lucky to keep them until January!).
No matter how we try, it’s hard to eat just one. Or even two…six…whatever. Go ahead and try these – I dare you to eat just one!
Want to save this?
Enter your email below and you’ll get it straight to your inbox. Plus you’ll get easy new recipes, gardening tips & more every week!

How To Dry Plums (Not Your Mother’s Prunes!)
Equipment
- Sharp Knife
- Cutting Board
- Food Dehydrator
Ingredients
- Italian plums (if using another type of plum, the drying time may increase since they are more moist than Italian types)
Instructions
- After washing, slice the plums in half all the way around the pit.
- Grab each half of a plum and twist gently to separate the halves. Remove and discard the pit.
- Place halves cut side down on the dehydrator tray (or cut-side up for less sticking – I can fit more in my dehydrator cut-side down). It's OK to pack them close together.
- Dry according to manufacturer's recommendations.* Depending on the size of the plums, start checking them in 4 to 6 hours, turning trays as needed for even dehydrating. Once they are looking more dry, flip them over to complete drying (they'll release from the trays the drier they are – leave them if they are too moist).
- Check every 2 hours, removing and packaging up any that are fully dry – showing NO moisture when touched, but are still pliable- and leaving the rest to complete drying.
Notes
Nutrition
Dried Plums FAQ
Yes! Though I personally have never dried plums in an oven, a reader let me know that she baked the halves at 180 degrees for 8 hours and they came out nice and chewy. You’ll still need to test doneness, since larger sized plums may take more time, but it’s a good starting point if you don’t have a dehydrator.
Another reader used a used convection oven on the lowest setting (170 degrees F), setting three trays into the oven and rotating them from top to bottom every three hours. He opened the oven door every hour or so to let the steam out and dried the plums halved and pit side up for 10 hours, left them overnight in the oven with it turned off and in the morning reduced everything onto one cooking sheet, set aside the plums that had sufficiently dried from the larger ones that had not, and dried them for another 3 hours until done.
Yes, you can dry regular plums, too. However, they are more moist than the prune-type plums so you will want to cut them thinner and dry them longer. They are typically sweeter, so the flavor isn’t the same, but it’s still a good dried plum option.
No. I think the skins provide a good chewy base for the rest of the plum.
Yes, all plums should be pitted and cut before drying to decrease the amount of time needed to dry this fruit.
You can try that, though it will take longer to dry. When I’ve had plums like that I’ve sliced around the pit, cutting the plum into quarters instead of just in half.
No, I never have and they are perfect.
More Easy Preserving Recipes


This recipe was originally published in 2012, updated in 2018 and again in 2022.
Disclosure: affiliate links in this article will earn commission based on sales, but it doesn’t change your price. Click here to read my full disclaimer and advertising disclosure.


My late wife and I use an Excalibur dryer. We have two 9-tray and one old 5 tray. We have all 3 going mostly drying fruit. Fruit leather is also made from preaches and apricots. Our grandkids love it. We dry prunes the same way as you do.
My wife knew the owner of Excalibur made. and had a 7-tray made from wood. It was one of the first made. It was traded for a new 9-tray. Put in their museum. On the sad side I not doing any gardening this year as my wife passed away in April. Also for some reason my trees did not srt much fruit .
I enjoy your newsletter and all the recipes. Thank you and God bless.
I’m so sorry for your loss, Clifford. I can imagine it impacting everything for you, including gardening. I pray that you will find comfort in time and your memories (hopefully not trite words – they do come from the heart💜). What a great connection to the Excalibur brand! If it’s any help, our fruit didn’t do well this year, either, other than the berries in their second year of full growth. You win some and lose some in gardening.
Your recipe is very similar to how the traditional Mexican “candy” (not sweetened but may have a small amount of sugar) called saladitos is made without the tons of alt. They may also have been drenched with lemon juice and dipped in red chili powder. They are always heavy on ingredients. It even appears you even used the same greenish plums. Pre-fully-ripened plums are preferred because it gives them extra tart (sour). They are made in several varieties. Below is s link to a variety of them. I eat them all the time.
https://www.amazon.com/s?k=chili+saladitos
How interesting! I’ve not heard of these before.
I’m trying to decide if mine are dry enough. If they are still a little sticky does that mean they need to be dehydrated longer. Or is moisture different than stickiness?
They should still be pliable and a little sticky, but not squishy in the middle (In the video I describe it more). Also, let them cool a bit before deciding, as they feel dryer when not so hot (I wait 30-45 minutes sometimes towards then end before testing).