How To Recover Dining Room Chairs

These $5 Craigslist chairs have become one of my favorite furniture face lifts in awhile. They were pretty easy to do and I just love how great they look with the $50 Craigslist table I redid last year.
In fact, as I wrote in the before and after for the chairs, I’m actually surprised at how much I like them, because they weren’t anything like the style I was looking for.
Don’t you love surprises like that?
Since I shared with you how I painted them, I thought I’d write up a tutorial on how I covered the faux-vinyl seats. It’s easy to cover chair seats and I’m sure many of you have already done this, but I want to cover all the bases (ha! cover the bases…) for those who haven’t, plus to share a few tips I’ve learned along the way.

These chairs needed extra padding, so I used some batting I had in my stash, trimming it to just wrap around the edges of the seat and then cutting out each corner (basically, cut a square out of the corner).
This is the biggest tip for covering chair seats: it’s all about the corners- making them less bulky, pulling them tight, and creating clean corner folds. So cut out the material that doesn’t need to be there like the batting.
Then I cut a piece of the fabric to just bigger than the batting. I eyeballed it, which I’m sure you can see in the picture because it’s obviously not a consistent 1-inch bigger all the way around. *smile* But this is a case where you’re going to cover up a lot, so there’s no need for precision. Whew.
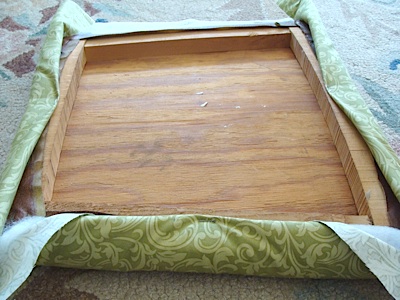
Starting in the middle of one chair side, fold the fabric over the batting, bring it up around the side, fold over the raw edge (technically, you probably don’t have to do this since no one’s going to be looking at the underside of the chair, but I can’t help myself if I have the ability to make it look nice!) and staple it securely.
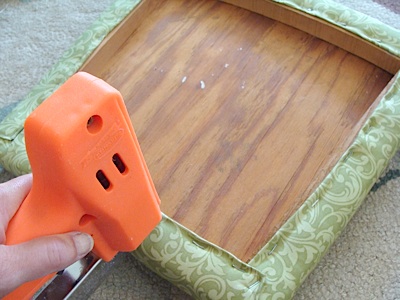
About the stapler- for many years I covered chairs with an old manual stapler that we probably got from one of our grandmas, but when I could no longer find staples to fit it, I broke down and bought an electric one and I must say – it really is easier to use and makes the job go quicker!
Repeat for the rest of the sides of the seat cushion, but only staple one or two times in the center of each side. Remember to pull tight when stapling the opposite side – I’ve read that having a tight upholstery job is what makes it look professional.

Now with the centers of your sides pulled tight and stapled, move to the first corner, cut about 2-3″ off the tip of the fabric at the corner to lessen the bulk and bring the fabric over the corner as shown in the photo.

Pulling as tightly as possible, tuck under the corner fabric and fold one long side of the fabric over it, making a pleat as shown above. Pull tight, from the side as well as up, and staple in place.
Now you can go back and staple from this corner to the middle staple on this side that you put in the beginning, pulling tightly up around the edges all the way. But only go to the middle– leave the other fabric loose until the corners are completed- it makes it easier to pull the fabric taut in the corners.

Now grab the other side of the corner, fold under the fabric to create a pleat and pull it tight over the first pleat to make a trim corner like pictured. Then go ahead and staple from this finished corner to the staple at the middle of the side before moving to the next corner.
Complete all the corners, remembering to pull tight, and stapling each side up as the corners are finished, until all the fabric is tightly stapled around the seat.

Reattach the cushion to the chair and pat yourself on the back- mission accomplished!
Now’s about the time I ask myself why I put this project off for so long when it was so easy. *blush*
Do you have any tips you’ve found helpful when recovering chair seats?
-Jami
This is linked to Transformation Thursday and Furniture Feature Friday.
I loved your work. You have really transformed the chairs and made them look like new chairs. The choice of fabric is also great and it looks beautiful on chairs.
Angela- Thank you! I love that color too, and I’m happy to share- it’s by Behr paint and it’s called “Creamy White.” Isn’t that perfect- the name actually matches the color. 😉
I was able to use the creamy white we use on all the trim in our house because I got that nifty new paint sprayer I wrote about a little while ago. When you use a sprayer, you get to use any color you like- you’re not limited to what’s available in a spray can!
Your chairs look fantastic!!! I love them — and I agree, I’m not sure I would have been that excited about them when they were in their original finish, but painted and with that snappy grean seat, they look amazing!
I was wondering — would you be willing to share what paint color you used? It’s just the perfect shade of creamy white! Thanks so much.
Love your blog!
~Angela~
Joanna- Thanks for reading!! And no, that’s not a silly question- a good one, actually. I didn’t address it in the post because every chair is different!
This particular chair DID actually just pop out and back in, which I’ve never seen before. 🙂 Most chairs I have done are usually screwed into the frame somehow. It’s not hard to unscrew them, though- just look to see what kind of screwdriver you need before removing it. And when you’re attaching the new fabric, make sure not to cover up the holes, so it’s easy to screw it back onto the chair (yes, I’ve learned that the hard way…).
Good luck with your chair- it’s a super easy way to get a new look!
Great instuctions!
Thanks,
Linda
thank you so much for this. i’ve always wanted to know how to recover a chair seat. i actually have one right now that needs redoing.
a silly question, but..do you just lift the seat off the chair and then set it back in when you’re done? is it that simple? (i hope so, lol)
love your blog, new reader.
joanna 🙂