Master Bedroom Paper Floor Problem
In Monday’s post, I alluded to an issue I had last week that involved gluing, crying, tearing, and gluing again. And then I left you hanging.
Not very nice of me. I’m sure that some of you have been up at night just wondering what on earth happened.
Well, you can rest easy tonight. Here’s the whole story:
After spending 7 hours gluing the torn brown paper to the floor of our master bedroom – just like I did in our last house, our son’s bedroom floor, and our daughter’s bedroom floor (which then got featured in Cottages and Bungalows magazine!) – I put the first coat of polyurethane on it, closed the door and left it to dry for the required time.
When I opened the door I saw this:
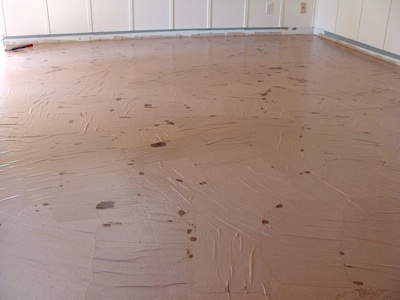
And gasped, “Oh no!” Maybe I screamed it. I don’t know, but I do know it wasn’t a happy sound.

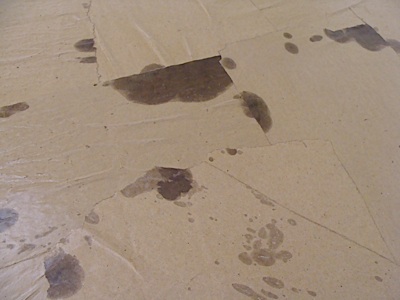
Oh, and in case you’re wondering – no, greasy spots are NOT supposed to be a part of the “leather-like” look.

How could this happen when I’ve done it so many times before?
I’m afraid to say it’s frugality gone awry. I thought the only reason I recommended water-based polyurethane in the video we did explaining how to do this flooring technique was because it dried fast.
When I went to the store to buy the items for this bedroom, I noticed that oil-based poly was now “fast drying” with only a 4-hour wait between coats. I could still get this done in one day and…here’s the clincher…
It was $15 dollars cheaper.
So, now we know there is another reason beside fast-drying time to use water-based polyurethane:
Paper and oil do not mix.
I should mention I learned one more reason to never use oil-based poly again (as if I needed another!)- the smell was so bad that it gave me a headache within the first 5 minutes of opening the can. I wish I was kidding. Then the smell wafted throughout the whole house and lingered for days.
And that was just with the one coat. Not worth it for me.
What did I do? Well, I did cry a bit- just at the thought of another 7 hours of gluing work that I thought was behind me. They were just tears of frustration. Ugh.

Then I started tearing up the paper. I thought I’d just get the greasy spots, as I didn’t want them showing through, but it was also still really wrinkled (it takes a good week for all the wrinkles to ease), so I needed to get those up as well. Then Brian sanded the whole thing with a palm sander to make sure any remaining oil poly would take the new glue.
I started tearing thinking it would take me a couple hours…eight hours later I was ready for Brian to sand. And that was with my daughter helping some. *sigh*

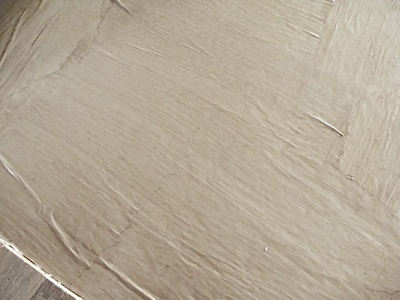
After another 7 hours gluing more paper down (my kids helped me tear and crumple the paper, bless them) this is the floor we now have.

Problem is- it doesn’t look anything like what we’re used to.
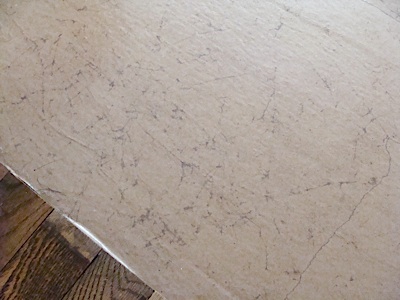
It doesn’t have that cool “texture-y” look the other floors have (this is a picture of our son’s room floor at the threshold to illustrate) that came from crumpling the paper.
And the color- sheesh, it looked more like Bandaids or plastic bags than leather. I kept waiting for it to dry more and see the look come through.
But it didn’t.
The only thing I can figure out is that I noticed that the paper seemed thicker than the last time I did this (a year ago). It didn’t tear as easily and was harder to get the rounded corners I prefer. The thicker paper must not soak up the glue/poly in the same way that creates that great mottled look that helps it look like leather.
So now I’ve brushed another coat of poly on top that I tinted with some walnut colored stain we had in the garage. And while it looks like paint brushed on, it’s actually better than before (which I didn’t get a picture of- it’s too hard to see in a photo- you’ll have to trust me on this).
I think with rugs and furniture, I’ll be able to live with it- but it doesn’t help that it’s right across the hall from two rooms that turned out much better.
In the end, my two-day project turned in to a 6 day ordeal – with our bedroom furniture stashed all through the house and us taking over our son’s bed (lucky he’s at camp most of the time).
And the cost? I had to buy more glue, more paper (the room needed slightly more than half a roll- so now I’ve got a LOT of brown craft paper left over from the second roll), and of course the water-based poly. My “saving” us $15 has now cost us an extra $57. *gah*
The (hard) lesson seems to be, stick with what you know works (learn from me, folks!), and find thin enough paper to get a good, mottled look.
Has anyone else experienced DIY issues like this “frugality gone wrong?” Please tell me I’m not the only one.
-Jami
Mine looks like plastic trash bags. I chose black Kraft paper. I’m not redoing it. I’m 30 hours in. I’ll just splatter paint it put a rug over it. I need it to last six months. Thankfully new flooring can go right over it.
Oh! I’ve never heard of black craft paper. I personally think it’s the creases you get from wrinkling the brown paper that make it look so cool – that didn’t happen with my bedroom floor and why I didn’t like it. When it works, it looks amazing. 🙂
Hey there! I was wondering if you might have any advice for repair. I have purchased a home with a paper floor, but it looks like they did not use enough poly to protect it. Under the washer and in a few other areas it is discolored and has a few tears all the way down to the old linoleum. We found a bucket of oil based poly we thought they must have used on the floor. Tried to dunk a piece of paper into the poly and just pasting it on top, but it wouldn’t stick at all. Just kept crumpling up.
Don’t suppose you might have any advice/ideas?
Hmmm, well I wouldn’t have used this in an area with a washer, but that’s just me. 🙂
And obviously wouldn’t have used oil based since that leaves oil marks on the paper.
Here’s how I patch areas: crumple new pieces of paper; brush water based poly over the areas you need to cover (go wider than discolored or worn areas to be sure); smooth paper over poly and then brush more poly over the top of the new pieces. If the pieces move too much, let them dry first before coating the tops with poly. Let dry and then add more layers of poly as you see fit to form a good top, drying between each according to the directions on the poly.
Here is a problem I encountered with laying down a brown paper bag floor in an entire house. Maybe you can help me figure out why this is happening? The house where I used the paper bags has several different types of floors. The living room was partially ceramic tile and part linoleum. Part of the house had a concrete floor and some rooms had wood. The person who helped me prepare the floors prior to installation used a quick drying concrete product similar to Quikrete to patch holes and level spots. He mixed it correctly and it was smooth and dry before we began the installation. About two weeks after we finished the paper bag floor, several spots began to dry out and rip holes everywhere he used the concrete product. What is strange is that it turned back into dry concrete dust piles under the bag floor. So we are getting holes with deep piles of concrete dust. Any ideas on why this is happening?
Sorry, I don’t have any experience with that type of flooring or the concrete mix, so I can’t help you. I’ve only ever applied this to plywood, fiberboard, and OSB.
I tried this in my kitchen, luckily I only did a small section but it didn’t stick in alot of places and there’s no wrinkles when it dried..
I know why this happened to your latest floor. It is the glue, not the paper. I too tried to save a little money. I am the cheapest woman alive, always trying to save even a penny whenever I can. I originally went to Home Depot, bought the $15 Elmer’s Glue-All Extra Strong Formula, and laid my paper using a 50/50 water mix. I completed 1/3 of my floor. Later, I was shopping the $1.99 pattern sale at Hobby Lobby and decided to see if their price on glue was cheaper. So when I saw a gallon of Elmer’s School Glue for $8 (after the 40% off coupon) I snatched it up. Right away I could feel the paper was different. I apply my paper a little differently than you. I dunk the entire unwrinkled piece in glue/water mixture, wad it up to wring out the mixture, and flatten it out on the floor with my hands and a brush. Seems to stick better that way. Anyway, I could feel that the glue was much different, and my result for the next third of the room was exactly like your latest room. I was using a different roll of paper, so thinking that was the culprit, I went to Lowes and bought all the different brands of paper they had. I also went to Home Depot and bought the original Extra Strong Glue-All. I tested the glue/water mixture on all the papers, let it dry overnight, and all of the papers came out texture-y, stone-like, vein-y, and non-lumpy as it had originally. Moral of the story: I think you may have used a different glue when you laid your original floor. It’s not the paper; it’s the glue. Anyway, thank you sooooo much for sharing this flooring with the world. I am absolutely in love with the look, low maintenance, durability, and cleanliness of it. When we pulled up the Lumber Liquidators laminate flooring, I was absolutely disgusted by the what was underneath. The mildew and whatnot that was able to get through the crevices and fester. Yuck. The seamlessness of this flooring means I never have to worry about that. Thank you, thank you, thank you. You are literally an Earth angel!
Wow, this is awesome, Kee Kee – I love your testimonial since it’s always what I have felt with this floor. 🙂 Thank you for the tips with glue and paper – your testing is great. And I’ve never thought of that happening under laminate flooring – good to know!!
What did you do with the floor? Did you tear up the post that didn’t stick or glue over it with the new glue?
I’m not sure if this is to me or Kee Kee, but I tore up the problem areas and reapplied, but this time with poly as the glue since we had already spread a layer.
Hi Jami,
We decided to do our master bedroom with the paper bag floor. We pulled up the carpet, padding, nails and filled all the holes and then prepped the cement with one coat of water based poly. Friday we tore and crumbled our builder’s paper and started applying the paper around 830 p.m. We didn’t finish applying the paper until 545 a.m. We had to get it done in 0ne shot because we have new bedroom furniture being delivered next Sat. We used miniwax red chestnut stain the next day and it was blotchy so my husband applied one more coat. I’m so impressed with the outcome. My daughter and I are now staying at my mom’s due to the smell and fumes (she’s been there since Friday). My husband is going to start the poly application this afternoon. It is supposed to rain later today and possibly the next couple days. Will that have an effect on the application of the water based poly? I really hope not but want to make sure because I’ve read in other blog posts that the poly needs to set for at least 4 days before putting furniture on it. Thank you in advance 🙂
Wow, that’s dedication to stay up all night!! I’m glad you like the finish. I always go by the manufacturer’s direction on the can of polyurethane – they usually state how long to wait before applying more coats as well as how long before you put furniture/rugs down. The brands I’ve used have said 5 days, I think.
In my experience, the water-based poly dries well no matter what the weather, it may take a bit longer, but only an hour or so I would think. Hope that helps – enjoy your floor!
And so far the oil based poly has been great. Really easy to apply- I did it with a brush and it seemed to level out pretty well. Now to clean the brush – which I hate!
Thanks for sharing! I feel your pain. I am ready to start the poly and thought it was water based, and it is not! So now I have to put on my nonpaint clothes and see if I can exchange it since I haven’t opened it yet.
I know how frustrating these projects can be! It helps me to know I’m not the only one that has problems! I am terrible at prep work and even though I thought I filled the seams good enough they still show through. And some of the spots I did seemed so thin I glued thicker paper over them. Stained with dark stain then messed up the doorway because my husband said he thought it was too dark. So had to reapply stain and it is a little off, but the overall effect isn’t bad. Thanks for the tip about the poly! Maybe I can avoid the tears on this one.
Oh, good – I’m glad you saw this in time and I hope you like the finished product, Debbie! And no, definitely not alone – so much of DIY is trial-and-error, isn’t it? 🙂
Thanks for you reply. Am ordering the Bona Traffic now (cheapest on your link, and fastest shipping) and taking back the oil based poly to Menards. I wanted to start today, thinking I would need at least 25 million coats! But with the Bona Traffic looks like it won’t take nearly as long. Would it be better to get the HD or is the regular good enough? The room doesn’t get a ton of traffic – through to the half bath and will be sewing/storage for me.
Love your blog and hope to start one of my own one of these days. Lots of goof ups to show, that’s for sure!
Oh, dear Debbie, I think that must’ve been an ad from my network (vs. a link I’ve added to an article) – using Bona is overkill for your project! (I hope you haven’t ordered yet…) That’s a commercial product. I’ve used polys from the home stores like Minwax waterbased Polycrylic, which is a LOT cheaper and lasts a long time. There are some people who’ve layered lots of coats, but I’ve always just used up the gallon in our rooms, which equalled about 3-4 coats and they lasted years and years.
Oops! Just read about not using oil based poly after I did my first coat :-(. So far it looks okay, so will see. I did apply oil based stain first so hoping it will be okay. I guess there is always linoleum :-).
Oh, if you used an oil based stain, it may not be a problem at all. That would make a big difference.
Came back this morning to read how many coats – I couldn’t remember how many you said and I had read someplace it seemed like I needed 25,000,000 or so! Anyway, I was headed in to do #6 when I read your comment, so I am now considering myself done with 5! It really looks perty good overall, if you don’t look too closely. I will TRY not to point out the flaws to everyone who comes to look at it – I am the imperfect perfectionst! I do find bumps and either hairs or glue, not sure which, so I will go with glue :-). I did try to clean some up but didn’t get them all. And by the time I was doing the 5th coat at 9:30 last night I really didn’t care too much :-(. And of course this morning is too late. Oh well, it is what it is! I can’t say I’m sorry I did it, but I’m not sure I would do it in any other room. The rest of our house has repurposed hardwood flooring we got from various and sundry places and I would have liked hardwood in there. I actually covered up hardwood, but it wasn’t in real good shape and somebody had taken a wall out and left a board and lots of jagged edges in it’s place. Debated a long time over what to do with it. but now it’s done, and I can’t wait to get the trim back up! Thanks so much. It’s been a pleasure.
I’m so glad it worked for you, Debbie! I think you will like it more when everything is put back. For the money, it is a good solution, still, I think. I’m with you, though – I’d take hardwood any day over this. 🙂 It’s always been a way for me to get rid of carpet or cover up unsightly things. Enjoy!
I just put the paper down last night and I have several fairly large ridges thru the floor what can or should I do
thaks
The floor might not be all dry, but you can cut the largest ripples and glue them down again – but I’d just use the poly to glue them this time. My experience has been the longer it sits after putting the poly down (like a week or two) the more it ‘relaxes.’ Hope that helps!
Hi Jami,
There are some water based (oil modified) stain and poly (2 in 1) combo available in the market ( e.g. Varathane One Step Stain and Polyurethane). Will it be a good judgement to buy one of these? Or should I stick with buying stain and poly separately?
And, if you suggest the latter, should both be water based, oil based, or of different base?
Much love
I would test an area, Sara – buy a small container of the poly-stain mix and see what you think (I always thought this would be the easiest and much faster). As for the types of stain, I’ve never actually applied a stain straight to the paper – the others I’ve seen do it have used oil stain with water poly (though this always seemed odd to me). I think I link to one of these on the FAQ page?
I did a bedroom about a year ago and loved it at the time. However it is now cracking and coming up. I’m trying to decide if I should try to patch/repair it or give up and put vinyl down. Any suggestions?
Sorry, Brenda! None of the floors we finished ever had those kind of problems, even years later (we did a 4-year follow-up video on our You Tube channel). I suppose it’s up to you if you want to just cover it all or patch. We did eventually cover our bedroom in a floating engineered wood floor, but that was our plan all along – the paper was a temporary way we could get rid of the carpet.