
Original Brown Paper Floor Tutorial: A DIY Alternative to Wood Floors
Welcome to one of our most popular DIY’s at AOC! This unique brown paper floor technique has been pinned and viewed on YouTube more than a million times and was even featured in an issue of Cottages and Bungalows! It’s a doable DIY that anyone can do and results in a leather-look flooring that lasts a surprisingly long time.
Below you’ll find a bit more about the technique, the video tutorial we made that shows all the steps needed to create this floor using brown kraft paper and glue, and a supplies list.

Some links in this article are affiliate links and if you click on them and purchase I will receive a small commission at no cost to you.
UPDATE: Check out the definitive FAQ for the Paper Floor Technique where we answer all the many questions we get about this cool brown paper floor solution to nasty carpet!
UPDATE #2: See our Brown Paper Floor Follow Up: How Do They Look 4 Years Later? video.
Wondering what the heck a paper floor is and if it’s really doable? It is a really cool, unique flooring method (which is basically decoupage) that I first created in our first house, a 1940 Portland bungalow.
We applied it to the stairs going up to a half story and all the floors in the upstairs, both an office and guest room-studio. I thought it would be temporary, but we were shocked how well it lasted, even on the stairs, and how much we liked it. We had no problem selling the house 5 years after laying for flooring – and the new owners thought it was really cool!
After moving to our 1980’s ranch, we knew we’d use the floor again to get rid of the old carpet, which we did for both our son’s room makeover and our daughter’s recent room makeover.
It’s been such a great alternative to expensive wood floors, creating a cool leather look while still giving the feel (decor wise) and easy upkeep of wood.
What’s wrong with carpet?
Brian and I are unanimous in our love of wood flooring and our hatred disgust dislike of carpet. Bear with me a minute as I get on a little soap box about wall-to-wall carpet.
Carpet is:
- expensive
- not an easy DIY project (more money for labor)
- hard to clean (pets? children?…hello?)
- “filter is full after 5 years” (exact quote from a carpet professional- translation: there’s no amount of cleaning that’s going to get it clean)
- dusty, dirty edges even with regular vacuuming
- an unchangeable color
- not great for certain allergies
- and, since we moved rurally, shows all of the dirt, mud and other dark things that routinely come in on people’s shoes…
OK, I’m down from the box and obviously you can guess where we stand. And while I know plenty of people who love their wall-to-wall, this video tutorial is for those like us who’d like to get rid of it, either because you can’t afford new or because you, too, don’t like carpet.
Needless to say, we are slowly getting rid of all the carpet that came in our ranch-turned-cottage and we are down to two rooms left: the master bedroom and the sunken living room. They will probably get some sort of wood, but for the kid’s rooms, we used this decoupage torn-paper technique we’re sharing with you that we’d used in our Portland bungalow with great success.
Wait? Really, a paper floor?
Yes! We love the doable DIY aspect of this as well as the look and the cost. It is easy, inexpensive and creates a (sort of) leather-look with minimal effort.
Does it last?
It’s coated with water based polyurethane so it has worn really well in the rooms we’ve used it, although I wouldn’t recommend it for high traffic areas.
How much does it cost?
How inexpensive is it? A 12′ x 11′ room cost just $65 total, or about .50 a square foot, which is actually amazing for new flooring.
Brown Paper Floor
Here’s what it looks like in our daughter’s room:
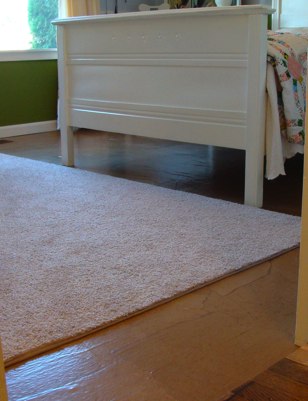
I love seeing this from the hallway now instead of the brown, stained carpeting. It looks a lot airier, too, and makes the room seem bigger.

Now we can get any color of carpeting we like and when it’s old and stained we can just buy a new one (and since this was just $25, it’s not a huge investment).

Here you can better see what the floor looks like. The pieces of torn kraft paper all came from the same roll, but they dry light and dark (I don’t know why), which I think creates a more interesting look than if it was all one color.
You can also see more of the finished floor in this follow up video.
Brown Paper Floor Tutorial Video
Interested in replicating this flooring option in your house? This tutorial video shows you all the steps and tools you’ll need, plus I’ve created a list of tools and supplies after the video:
Brown Paper Floor Supplies
Floor Preparation
- Wood filler for any gaps or holes in subfloor.
- Sanding paper for rough areas and edges.
Applying The Paper
Brown “Builder’s Paper” – the 140-foot roll covered a 12×11′ bedroom and a 11×11′ for us:
- Amazon: Easy Mask 35-inch x 140-feet Brown Builders Paper
- Home Depot (where we get ours): Trimaco Easy Mask 2.9-ft x 140-ft Builder’s Paper
Gallon Size Glue – one gallon covers a 11’x11′ or 12′ room:
Other Tools:
- Small bucket and stir stick
- 3-inch paint brush
- scissors
- trash can
- container to hold water
Optional Staining
This step isn’t in the video, but would happen after the glue dries but before you apply the polyurethane. See FAQs for more on staining; note that I don’t recommend oil based stains like the examples since everything else is water based:
Water based stain in a color you’d like. Here are two options:
Application:
- 9-inch pad applicator (to work with an extension pole)
- For edges use disposable chip brushes or 2-inch foam brushes
- Disposable gloves
Polyurethane Coating The Paper Floor
Floor Grade Water Based Polyurethane – 1 gallon for a 10×10′ to 10×12′ room will give about 5 coats:
- Amazon: Minwax Polycrylic Water-Based Protective Clear Finish, Satin, or Varathane brand for floors in a single pack
- Home Depot: Varathane Satin Water-Based Floor Polyurethane (pack of 2)
To apply poly with a brush like I show in the video:
- 4-inch brush (attached with duct tape to a long PVC pipe pole)
To apply poly with a painter pad on a pole:
To apply poly with a roller (use only foam to minimize shedding and bubbles – these weren’t available when I first did the floors):
- 9-inch foam roller (attach to a roller with an extension pole)
- Extension Pole
Paper Floor Testimonials
Kee Kee 1/2019
Anyway, thank you sooooo much for sharing this flooring with the world. I am absolutely in love with the look, low maintenance, durability, and cleanliness of it. When we pulled up the Lumber Liquidators laminate flooring, I was absolutely disgusted by the what was underneath. The mildew and whatnot that was able to get through the crevices and fester. Yuck. The seamlessness of this flooring means I never have to worry about that. Thank you, thank you, thank you.
Dee 5/2019
I did this technique about 13 years ago in a bathroom – still holding up Haven’t even needed to repoly. Insane
I added stain to my glue mix and I also did over vinyl . No problems . I did small pieces of paper , crinkled . Love It 13years!!! poly poly poly poly ! It looks amazing! And it is a heavily traffic area – our laundry in there also. Simply amazing.
Please let us know if you use the technique- we’d love to hear (and see!) how it turned out for you!
This tutorial has been updated – it was originally published in August of 2010.
Disclosure: affiliate links in this article will earn commission based on sales, but it doesn’t change your price. Click here to read my full disclaimer and advertising disclosure.

We did this in our son’s room, our pantry, our kitchen, and a friend’s dining room. We used Trader Joe’s bags for our son’s room, because the patterns made an interesting little detail to his pirate themed bedroom. Then we stained it with a walnut stain, which made a much richer, deeper leather look. The kitchen is all black and white, so we did a dark black stain, and our kitchen floor looks like black glass. Unfortunately, our dishwasher malfunctioned, and we didn’t thoroughly seal enough under it, so when it flooded the entire kitchen, the super hot water got under the flooring, and lifted it, creating bubbles and weak spots even after it dried. However, because the floor pattern is so simple to repair, my husband is able to patch and repair with little difficulty. Our friends dining room is stained an ocean blue color, and even with children and heavy traffic, it has held up beautifully.
This is wonderful to read, Nicole – the different colors and papers you used as well as how it’s held up and ease of repair! Thanks so much for sharing.
Hey guys!
I seen your video/s and read your blogs….inspired me (and all the other video’s that talk about paper floors and websites) to try the paper floor tech on concrete. We (my husband and I) first did my son’s room that we had originally painted over the concrete w/a concrete paint. We did an equal part glue to water and had did the “wood plank” look. Turned out AH-MAZING “BUT” it has a TON of wrinkles!!! It’s been 3 weeks since we did the floor and the wrinkles has gone down a little…..but, they still remain everywhere. If we were going to stay here in the home, I wouldn’t mind keeping the look but because we will be moving in 6 months I figured not everyone would want to keep that look. So, my question is: I would LOVE to keep the paper floor but if I go over w/more paper won’t it continue to wrinkle? How can I fix the problem??? Any suggestions?
Paper Floor Lover,
Laurie
Sorry Laurie! I’ve read that for concrete it works better to use the polyurethane to glue the paper down as well as using it as the topcoat. Something to do with the porous nature of concrete, maybe? Going over top coated paper, you’d do the same thing, too. I would take a putty knife and cut through the wrinkles that are big and then try redoing it, but in a test area to see how it looked (closet or something). I also think the wrinkles are less when the paper pieces are smaller, from my experience. Good luck!!
TY for responding so quickly! We would have to take up the whole floor due to EVERY piece has a wrinkle it. Some a lot worse than others…..We just moved all my sons furniture back into the room and decided if the wrinkles don’t go down before we move we’ll just cover w/carpet. We have one more room we would like to try the paper on. It’s concrete also. We previously painted over the concrete (same as the other room)…..what would your suggestions be? I’ve heard sand it first. I’ve heard polyurethane instead of glue (as you mentioned)…
Thanks so much!
Laurie
I’m not sure it matters that the concrete is painted, Laurie. I’d use the poly-only method and try using smaller pieces of paper to minimize the wrinkles. Sorry to hear that your first floor has so many wrinkles, I wonder if it’s from the longer pieces of paper – I haven’t tried that wood plank look with it. 🙁
I did this to my entire upstairs and it looked fantastic at first however after several weeks I ran into a problem. I have an old house with old wooden floors where the planks were separating a bit (you could fit the side of a dime in the cracks). After the paper settled all the lines from the floor boards show thru the paper. Also I did not have time to do the entire upstairs at once so I had to do it one room at a time so in the doorways it is starting to peel. I love this technique and plan on doing it to my downstairs but have a few tips. Fill in lines, small holes etc before hand and us extra glue in the mix if you have to do rooms separately.
Thank you for the tips, Laurie! Yes, we’ve found that to be true as well – any cracks will eventually wear through. 🙁