
Original Brown Paper Floor Tutorial: A DIY Alternative to Wood Floors
Welcome to one of our most popular DIY’s at AOC! This unique brown paper floor technique has been pinned and viewed on YouTube more than a million times and was even featured in an issue of Cottages and Bungalows! It’s a doable DIY that anyone can do and results in a leather-look flooring that lasts a surprisingly long time.
Below you’ll find a bit more about the technique, the video tutorial we made that shows all the steps needed to create this floor using brown kraft paper and glue, and a supplies list.

Some links in this article are affiliate links and if you click on them and purchase I will receive a small commission at no cost to you.
UPDATE: Check out the definitive FAQ for the Paper Floor Technique where we answer all the many questions we get about this cool brown paper floor solution to nasty carpet!
UPDATE #2: See our Brown Paper Floor Follow Up: How Do They Look 4 Years Later? video.
Wondering what the heck a paper floor is and if it’s really doable? It is a really cool, unique flooring method (which is basically decoupage) that I first created in our first house, a 1940 Portland bungalow.
We applied it to the stairs going up to a half story and all the floors in the upstairs, both an office and guest room-studio. I thought it would be temporary, but we were shocked how well it lasted, even on the stairs, and how much we liked it. We had no problem selling the house 5 years after laying for flooring – and the new owners thought it was really cool!
After moving to our 1980’s ranch, we knew we’d use the floor again to get rid of the old carpet, which we did for both our son’s room makeover and our daughter’s recent room makeover.
It’s been such a great alternative to expensive wood floors, creating a cool leather look while still giving the feel (decor wise) and easy upkeep of wood.
What’s wrong with carpet?
Brian and I are unanimous in our love of wood flooring and our hatred disgust dislike of carpet. Bear with me a minute as I get on a little soap box about wall-to-wall carpet.
Carpet is:
- expensive
- not an easy DIY project (more money for labor)
- hard to clean (pets? children?…hello?)
- “filter is full after 5 years” (exact quote from a carpet professional- translation: there’s no amount of cleaning that’s going to get it clean)
- dusty, dirty edges even with regular vacuuming
- an unchangeable color
- not great for certain allergies
- and, since we moved rurally, shows all of the dirt, mud and other dark things that routinely come in on people’s shoes…
OK, I’m down from the box and obviously you can guess where we stand. And while I know plenty of people who love their wall-to-wall, this video tutorial is for those like us who’d like to get rid of it, either because you can’t afford new or because you, too, don’t like carpet.
Needless to say, we are slowly getting rid of all the carpet that came in our ranch-turned-cottage and we are down to two rooms left: the master bedroom and the sunken living room. They will probably get some sort of wood, but for the kid’s rooms, we used this decoupage torn-paper technique we’re sharing with you that we’d used in our Portland bungalow with great success.
Wait? Really, a paper floor?
Yes! We love the doable DIY aspect of this as well as the look and the cost. It is easy, inexpensive and creates a (sort of) leather-look with minimal effort.
Does it last?
It’s coated with water based polyurethane so it has worn really well in the rooms we’ve used it, although I wouldn’t recommend it for high traffic areas.
How much does it cost?
How inexpensive is it? A 12′ x 11′ room cost just $65 total, or about .50 a square foot, which is actually amazing for new flooring.
Brown Paper Floor
Here’s what it looks like in our daughter’s room:
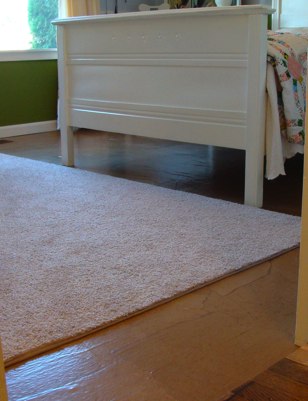
I love seeing this from the hallway now instead of the brown, stained carpeting. It looks a lot airier, too, and makes the room seem bigger.

Now we can get any color of carpeting we like and when it’s old and stained we can just buy a new one (and since this was just $25, it’s not a huge investment).

Here you can better see what the floor looks like. The pieces of torn kraft paper all came from the same roll, but they dry light and dark (I don’t know why), which I think creates a more interesting look than if it was all one color.
You can also see more of the finished floor in this follow up video.
Brown Paper Floor Tutorial Video
Interested in replicating this flooring option in your house? This tutorial video shows you all the steps and tools you’ll need, plus I’ve created a list of tools and supplies after the video:
Brown Paper Floor Supplies
Floor Preparation
- Wood filler for any gaps or holes in subfloor.
- Sanding paper for rough areas and edges.
Applying The Paper
Brown “Builder’s Paper” – the 140-foot roll covered a 12×11′ bedroom and a 11×11′ for us:
- Amazon: Easy Mask 35-inch x 140-feet Brown Builders Paper
- Home Depot (where we get ours): Trimaco Easy Mask 2.9-ft x 140-ft Builder’s Paper
Gallon Size Glue – one gallon covers a 11’x11′ or 12′ room:
Other Tools:
- Small bucket and stir stick
- 3-inch paint brush
- scissors
- trash can
- container to hold water
Optional Staining
This step isn’t in the video, but would happen after the glue dries but before you apply the polyurethane. See FAQs for more on staining; note that I don’t recommend oil based stains like the examples since everything else is water based:
Water based stain in a color you’d like. Here are two options:
Application:
- 9-inch pad applicator (to work with an extension pole)
- For edges use disposable chip brushes or 2-inch foam brushes
- Disposable gloves
Polyurethane Coating The Paper Floor
Floor Grade Water Based Polyurethane – 1 gallon for a 10×10′ to 10×12′ room will give about 5 coats:
- Amazon: Minwax Polycrylic Water-Based Protective Clear Finish, Satin, or Varathane brand for floors in a single pack
- Home Depot: Varathane Satin Water-Based Floor Polyurethane (pack of 2)
To apply poly with a brush like I show in the video:
- 4-inch brush (attached with duct tape to a long PVC pipe pole)
To apply poly with a painter pad on a pole:
To apply poly with a roller (use only foam to minimize shedding and bubbles – these weren’t available when I first did the floors):
- 9-inch foam roller (attach to a roller with an extension pole)
- Extension Pole
Paper Floor Testimonials
Kee Kee 1/2019
Anyway, thank you sooooo much for sharing this flooring with the world. I am absolutely in love with the look, low maintenance, durability, and cleanliness of it. When we pulled up the Lumber Liquidators laminate flooring, I was absolutely disgusted by the what was underneath. The mildew and whatnot that was able to get through the crevices and fester. Yuck. The seamlessness of this flooring means I never have to worry about that. Thank you, thank you, thank you.
Dee 5/2019
I did this technique about 13 years ago in a bathroom – still holding up Haven’t even needed to repoly. Insane
I added stain to my glue mix and I also did over vinyl . No problems . I did small pieces of paper , crinkled . Love It 13years!!! poly poly poly poly ! It looks amazing! And it is a heavily traffic area – our laundry in there also. Simply amazing.
Please let us know if you use the technique- we’d love to hear (and see!) how it turned out for you!
This tutorial has been updated – it was originally published in August of 2010.
Disclosure: affiliate links in this article will earn commission based on sales, but it doesn’t change your price. Click here to read my full disclaimer and advertising disclosure.

I did this project in my home (over concrete, no stain) and I am BEEEEEEEE-YOND excited with the outcome. I can’t say THANK YOU enough to all of the people before me who did this and took the time to share what they learned. They were my supporters and encouragers and didn’t even know it. This has changed my whole outlook on my home, and yeah…carpet! If you ever have to pull up your own carpet, you’ll never put down more again. I join Jami on that carpet soap-box.
I did a TON of research before I started this project (but not before ripping out my carpet and baseboards and painting myself into a corner, no pun intended. Ok yes it was.) and I tell you, I honestly don’t understand how this could have become an epic fail for some. I really really don’t. I am in NOOOO way a DIY-er….I am the epitome of NOT being a DIY-er, the ANTI-DIY-er, NOT the person people call even if they’re drawing stick figures. However, I do carry a bit of common sense and I seriously think that is all you need to accomplish this project successfully. Well, and a bit of patience…because when you’re done it is best to let the floor “cure” for a while before putting any furniture on it. So I lived very sheik-ly for about 2 weeks climbing over my entire bedroom as it sat patiently in the living room waiting for me to finish. Oh and it takes some hutzpah…because it is DEFINITELY a lot of work. Once the paper is down, you’re looking at this beautiful floor that now requires another 8-12 coats of Varathane. After the 3rd coat all you really want to do is cry. But you’re committed at this point and MUST go on!
With that said, I don’t have a video to share nor do I know how to post pictures in this blog, so feel free to email me with questions at iheartpink@att.net. I am happy to share my experience because of what it has done for me and my home. This is a long read but I hope that it answers all of those questions that weren’t answered for me, even after reading over 15 sites regarding this project. So many questions and fears that I almost didn’t do it.
Materials used:
Blood, sweat, tears, sleeping hours, family time, and old fashioned get-up-and-go
Hammer and chisel to remove baseboards
Muscles to remove carpet, pads and carpet tacking.
Mapai Planipatch to fill carpet tacking holes.
Broom, small broom & dust pan, vacuum, mop w/water only, and scraper to “prep” the concrete
Good ol’ normal Butcher/Contractor Paper
Water-based Clear Satin Varathane (about 3 gallons total for a 200 square foot room)
Cheap 4 inch paintbrush
Box of powder free latex free gloves (no idea if powder and latex would make a difference and I’m not revealing how I came upon a box of them. A girl never gives up her accomplices)
Beverage of choice (mine was wine)
Where to begin? At the beginning…Prep the floor. I think the hardest part of this entire project was prepping the floor. I read blog after blog after blog that gave tons of info on the project itself but all that was said about prepping was just that – prep the floor. What the heck does that mean???? I’ve never seen the underside of a carpet in my entire 40 years of life! Well I figured out that GREAT care should be taken in getting all of the dirt off of your concrete floor. It will save time in the long run. I’m serious – ALL of it…even the little pieces UNDER the sheetrock and behind the baseboards. Yes, I removed my baseboards…I’m EXTREMELY anal and all of my baseboards HAVE to match and I had NO intention of putting up shoe baseboards (or whatev the heck they’re called) throughout my entire home. I really needed to sand and repaint mine anyway and sanding is much easier if they’re not on the wall. So down they came and with that ALL of that sneaky dirt that’s been hiding in my walls came out – YUCK!!! Next, I scraped all of the glue from the carpet off of the concrete and I scraped with great care. I am CHEAP CHEAP so I didn’t buy some high dollar scraper, nor did I purchase some remover or stripper or whatever the Home Redo stores call it. Just a cheap ol’ scraper that resembled a razor blade doubled in length, clipped at the end of a foot long pipe. Come to think of it, I may just duct tape a contraption next time, seriously. Anyway, so I scraped like a crazy woman because I still wasn’t fully confident that I understood what “prep” meant. And throughout prepping I was REALLY nervous about these areas where the builders had obviously had a fight with the concrete and the concrete won. Or where I had not done the greatest job with the Mapai Planipatch filling in the carpet tacking holes. I was terrified that these lumps were going to show or be felt but for the life of me I couldn’t get them up with the scraper. I considered not being so cheap and taking a trip to the Home Redo store, but in the end cheap won out and I figured I’d just see what it did. Now mind you, this is my Master Bedroom, my sanctuary…so I’m not sure what I was thinking but there you have it. Well, come to find out now that all is said and done, you really can’t see or feel the carpet glue or concrete imperfections or Planipatch mess through this floor. Even pretty major imperfections. BUT, you can feel a tiny speck of dirt – go figure. Princess and the pea effect I guess. So I am now glad that I VORACIOUSLY swept, vacuumed, and mopped. But it still wasn’t enough because even after all that I STILL had to have a small broom and dust pan beside me throughout the whole process. If I had it to do over again, I’d sweep, vacuum and mop MORE. Oh and I wouldn’t use Planipatch. It is WAY to liquid-y. I would just use something that has a dense enough consistency to push it into the carpet tacking hole, spatula it smooth, and move on.
So, on to the paper. I used good ol’ butcher paper from Lowes. I think it said Contractor Paper on the label and is actually meant as a paper drop cloth or something. Anyway, it’s perfect and cheap. Some sites said to take note of the underside of the paper by drawing on it…I didn’t. Some said one side of the paper would look and feel differently than the other. It didn’t. I’m a 4 ingredient kinda cook – the easier the better. While that makes me a horrible cook (truly) I think it came in handy with this project and could be why some pieces are darker than others. But to me that is part of what makes this look AWESOME. I had also read that the smaller the piece and the more wrinkled the paper, the more “leather-y” the floor would appear. This proved to be true for me. I am glad that I went with random pieces. Some 6 inches, some 10 inches, some 12 inches in size. Some very wrinkled, some lazy wrinkled…because yes, it gets exhausting. I didn’t tear everything I needed at once, there was no way my math skills were going to tell me how much paper that was. So I just went with a big pile, definitely keeping the straight edged pieces separate from the inside pieces, as you would if you were putting a puzzle together. Some pieces were torn with a rounded appearance to them, some pieces were torn into squares, some were torn into triangles. Friends helped. There was no consistency or uniformity. I think the definite takeaway here is to NOT be anal about the shape and size of your pieces. Otherwise, I would think it would look too contrived, too conformed, so you lose that “look”. Just tear…sip some wine or other beverage of choice…repeat. Make it fun. Seriously, because as I said, this is a long project!
Next…how to apply it? OMG, I read site after site and varying opinions on this process too. Enough to almost scare me away from this project entirely but I had already ripped out my carpet and baseboards so what was a girl to do? Again, my cheap and lazy side won out. I did not use glue !GASP! I used Varathane only. Let me tell you, all worked perfectly. So forego the glue and save yourself some money. Oh and yeah, most importantly – a step in this process because you’ll have plenty. One website, I think her name was Karen, was doing her basement, and she simply applied the paper to the floor using the Varathane. So there you have it – that’s how I applied the paper. This was after much research and much fear so hopefully I can save you some trepidation about not using glue. I did decide to go with the expensive water-based Varathane and I am happy to say that I did because I don’t know if I could have smelled 12 coats of the oil-based, seriously. Oh and I went with Satin. I don’t know if that makes any difference in the grand scheme of life or not, I’m not a DIY-er as I’ve said, I think it’s just a preference. I know some used Semi, some used High…but I’m not into seeing my reflection in my floor, the mirror is enough. I really wanted it to have that “leather-y” look to it yet not too flat, hence why I also chose not to go with the Matte. Like I say, I think it’s a matter of opinion. And I used a cheap ol’ 4 inch paint brush. It was one of those paintbrushes found on the bottom shelf with no pretty packaging and barely a price tag but I tell you, that paintbrush worked PERFECTLY in all its fake synthetic glory. I am VERY proud of my little tenacious paintbrush who is still shining, even after 12 coats. She will be with me when I start the living room. Cheap is also good so that you can buy 3 and make your friends help! Grab your BFF (she owes you right??) and make it a girls’ night in. Grab your Varathane, grab your paintbrush, grab your gloves, grab a small broom and dust pan, grab a small trash bag, grab your scraper, grab your paper, grab your drink and plop yourselves down in the corner furthest from the door because as I’m sure you realize, you’re going to have to work your way out of the room. Or else it will get lonely when the drink is gone and you have nothing to do but wait 12 hours for it all to dry. Put your gloves on and paint a…oh wait, let me stop here and let’s talk about this Varathane for a minute, which I had NEVER even heard of in my DIY-free life. In all of my frightening research, I came across sites that talked about epic fails – cloudy, bubbly, streaky, brush slowly, brush quickly, don’t use too much, don’t use too little. Again, I almost quit because seriously, what the heck does that mean “too much or too little”???? But I have to tell you…this Varathane stuff is THE most forgiving substance I have EVER used. On the spectrum of Unforgiving (10) to Forgiving (1), I consider Stain VERY unforgiving, a 12! You know what I mean right? The crap dries so fast that if you have a bubble or a drip or don’t like the streak you just created, you’re pretty screwed, because if you try to go over it again to fix it, you end up with this gooey gunky over-staned mess. Not with Varathane! My rating of Varathane comes in at a -5 …NEGATIVE FIVE! To me, you might as well be working with water. It’s so easy and smooth and even if there are streaks or bubbles or it looks cloudy at first (come on folks, it’s white…it’s going to look cloudy at first) it’s all gone in seconds flat. So have no fear, if I can do it, you can do it. So with all your stuff around you and your pretty gloves on, get to putting this paper down already! Remember, I ripped my baseboards off so I didn’t have to be too careful about using “edge” pieces around the wall but I would suggest being careful about this if you’re not taking your baseboards down. That way you have a nice straight line. So grab your piece of paper. Dip your paintbrush in the can about a ½ inch and paint an area that’s slightly bigger than the piece of paper you’re about to put down. Plop your paper on top of that and use what’s left in your brush to brush the top of the paper. There is no reason to be specific here, I just say that because it’s the process I used. Some people said to spray the paper with water, well I couldn’t find a spray bottle, so I just went with seeing what happened. Using what was left in the brush was enough to get the paper slightly damp enough to keep it in place while you go to dip your paintbrush, again about a ½ inch. This 2nd dip should be enough to saturate your piece of paper. Just brush it on there – get at it! Don’t be formal or worry, just do it. Use your gloved hand to push the Varathane around and into the paper and flatten the paper to the concrete. Using your hand also helps because you can feel if you’ve missed any areas that should be scraped better or any dirt that needs to be picked up. If you feel any of these issues, just pick up the paper, fix the problem, put the paper back down, and use your hand again. The good news, this process is NOT like putting a sticker on a kid’s tiny Hot Wheels car where you get one shot to get the dang thing on straight. Just make sure each piece is good and wet. And flat. If it feels smooth enough and you feel like the air is out and it’s good and flat, then brush over it to even out the Varathane you were “finger painting” with and start your second piece. I don’t think I took more than 15 seconds putting down each piece, really…it can’t take a lot of talent because I tell you, I don’t have any. On your second piece, slightly overlap it with the first, or go crazy and crazy overlap it. You can’t feel the overlapping once the floor is done so you don’t have to be particular in how much you do or don’t overlap. This was another concern of mine which remained unanswered until all was finished. As I said, I’m very anal. But I wasn’t familiar with this so I didn’t know what to be anal about. I just had to tuck Anal Her away and ignore her screaming and brooding. She is of no use in this project. I think she’d make it worse honestly. So continue on with piece 3 and 4 and so on. As you’re doing the rest of the floor, look up at what you’ve done every once in a while (smile at your accomplishment) and see if there is any MAJOR “lifting” going on. Lifting, as if the corner of a sticker were curling up. Like really curling up. I’m not talking about little gaps in the edges here and there, that’s going to happen at this step but will disappear in later steps. But a major curl at a corner should probably be addressed before going on. I did anyway, though no research I did really said I should or shouldn’t. I was too frightened not to though. So, if you see lifting, just Varathane the corners back down again. It’s that easy. Continue on til you’re done. I didn’t stop in the middle of this process so I can’t tell you if it would create a line or not. I wouldn’t think so and here’s why. When you leave your floor to dry that evening, it pretty much looks at this point like it’s going to look in the morning. I read on some sites that their floor looked a mess and had lifts everywhere and so forth as they left it that evening. Well, mine pretttttt-y much looked the same the next morning. Except there were a few lifting areas that snuck in on me in the middle of the night. No fear, follow the same application process to put another piece of paper down over the lift and you’re good to go. You’re not going to be able to see this “patch” later, I promise. And remember, tell Anal to ignore the small gaps in the edges or you’ll be there all morning and waiting another 12 hours for the floor to dry again. These gaps WILL go away, pinky-swear. And don’t panic that this step will take the entire first can of Varathane and a bit of the 2nd can. You’re using A LOT this first time around and I personally counted this as Coat #1. And now we’re on to the rest of the coats.
As for the coats…from what I have read, the number of coats depends on you and how much traffic the floor experiences. My Master Room, for some unknown reason, perhaps because it’s supposed to be Mommy’s Haven, is the center of the dang house. Every child, adult, and animal that visits is in my room, my bathroom, my clothes, my closet…it is high traffic. So I went with 8 coats. I don’t know yet if 8 coats is enough…I haven’t been using the floor long enough to say. But that used the remaining 2 cans of Varathane and looks amazing so I’m happy with my choice. As I said in an earlier paragraph, this Varathane stuff is so easy and nice and sweet so I wasn’t the least bit careful in my application of the coats. I dipped my brush (same good ol’ cheap brush) about an inch in and used what was on the brush to cover an area about a square foot. Scooted my butt (and my drink) and did the next square foot. All 200 of them. A friend of mine duct taped his brush to an extension pole and that seemed to work just fine too. And I’m sure his back isn’t hurting as badly as mine. But I personally liked being up close and personal for a couple of reasons. First, no matter how clean you are, dirt seems to always find its way in but if you’re up close and personal you can see the dirt and sweep it up BEFORE you put your brush into it. No fear if you paint the dirt, just use your finger to pick it out of the Varathane and move on. Secondly, I liked being up close because it allowed me to see what was going on with this enigmatic Varathane stuff. I kept expecting that epic fail at any moment – for it to suddenly bubble or lump or turn cloudy or the paper to just totally curl or entirely self-combust – you never know! But it didn’t. And thank goodness it never did because after that first coat and counting down to 7 more, I just knew I would cry and need a confessional if this floor went wrong. There were only 2 things I chose to be anal about when it came to the coats of Varathane. The first of which was painting each coat in a direction opposite from the one before it. For example, if coat 1 was painted east to west, then coat 2 was painted north to south. And so on, repeating this for the other coats. I read on some site somewhere that doing this would make it smoother and decrease the potential need to sand the floor in between coats. No way in H-E-double-hockey-sticks was I EVEN about to pull out my 8-inch sander on 200 square feet. I can’t tell you if it helped, I don’t know. All I can say is that my floor is dang smoother than a baby’s bottom and I didn’t sand once. The second thing I MEANT to be anal about was doing each coat no more than 2 hours after the previous coat dried. Again, I had read this would help with not having to sand the floor. This intention flew out the window at 4am in the morning due to extreme exhaustion at this point. I woke up at 10am in a complete panic, totally expecting to take a trip to the Home Redo store to rent a sander. But cheap (and exhausted) won out and again I decided to take the “see what happens” route. There was no need to worry and I tell you, there’s no need to sand a THING! Just do your coats, get ‘em all in that you can and as quickly as you can. Quickly helps to reduce fighting with the dirt that collects. And quickly, because now you will have to wait.
And wait, apparently for it to cure. The amount of time is really up to you. The Varathane can says to wait 3 days but who knows if this is true for 8 coats. The can only instructs to use a minimum of 4 coats. Many sites I researched said 5-7 days. I went with 5 days and also followed the suggestion to put felt pads on the bottom of my furniture because it sounded like good, sound advice to me. All seems to be absolutely perfect!
Yes, I’m exhausted. But I’m so happy and so proud of my work, especially being such a newbie to all of this. I’m very glad I didn’t try to add staining to this process. There were WAY more than enough steps without it and I tell you, the color of the floor when it’s done is a BEAUTIFUL camel/caramel color. So I say for the last time – just do it. Try it. You can. If I can, you can!
WOW. What a comment, Ellary – thank you for taking the time to leave such details for others who are wanting to do this floor technique! I’m so glad you are happy with the outcome – and very impressed that you took this on without being a “DIY-er.” Kudos! And some of your thoughts have made me want to go back and revisit some of my directions – I thought I had been pretty clear on the floor prep, for one (cleaning, filling holes, smoothing bumps and plywood edges, etc.). I love it when readers give such great feedback so I can see it through their eyes. 🙂
One thing I did want to mention, though, is the glue vs. varathane for the first step. We’ve only done it on pressboard/plywood subfloors and the glue mixture was a way to keep the expense lower (a $10 gallon bottle of glue vs. a $40-50 gallon of varathane….) and replicated the decoupage technique I was basing this DIY project off of when I first did it 15 years ago. After I blogged about it and it was featured in Cottages and Bungalows, people with concrete wanted to do it, and since concrete is often porous/moist/different than wood, the consensus has been to go with straight varathane and forgo the glue-water mixture. Anyone is free to use the varathane for all the coats no matter the subfloor, though, and it may lessen the wrinkles, since it wouldn’t have the water content. And if all you can find is a heavier paper (which happened to me on one of my floors – same paper I always get was noticeably heavier and didn’t wrinkle as easily), I recommend using the Varathane for all the steps, as it seems to do better with the heavier paper.
I, too, love the normal color – plus I never am up for another time-taking step at that stage, either, ha!
Amazing post, Ellary!!!!! Just finished reading, and it was pure inspiration to see this project fresh through your eyes. I have been reading, and reading, and re-reading paper floor posts galore, until I can barely see straight. My ‘Anal-Bimbo’ alter-ego would argue that you can never research a procedure too much,(she is such a fibber) but my split personality ‘Foot Loose and Fancy Free Babe’ side is itching to bust loose and do something radical. Thanks to Jami and you, I think the later ‘she’ is going to win! I could not stop laughing, laughing, laughing at your delightful sense of humor, (you are, by the way, a most gifted writer……please tell me you make your fortune using this unique talent!!!) and you addressed the few final hesitations I have had about starting this project. Thank you for sharing your experience in such a thorough, detailed way. Any ‘anal’ voices I had been listening to about starting this adventure are now locked-up in the ‘Get Over There, Sit Down, and Shut Up Asylum’ for the time being. FL&FFB has the keys and does not plan on letting her out anytime soon! 🙂 Carpet is up, so let the prep work begin!!!!!
Hi! Thank you so much for your blog and videos. I was talking to my husband about the use of polyurethane on butcher block counters and paper bag floor. He was concerned about it getting sticking when the weather gets hot. Do u have this issue? Is there away to avoid that? Thank you!
Oh, no, that’s never happened to us LaDona! It’s never gotten sticky at all – even if water sits on it. 🙂
We have heated floors. Would this process work with that?
Wow, I have no idea about that, Mary! You’ll definitely need to do a test area with this and see how it works.