Master Bedroom Paper Floor Problem
In Monday’s post, I alluded to an issue I had last week that involved gluing, crying, tearing, and gluing again. And then I left you hanging.
Not very nice of me. I’m sure that some of you have been up at night just wondering what on earth happened.
Well, you can rest easy tonight. Here’s the whole story:
After spending 7 hours gluing the torn brown paper to the floor of our master bedroom – just like I did in our last house, our son’s bedroom floor, and our daughter’s bedroom floor (which then got featured in Cottages and Bungalows magazine!) – I put the first coat of polyurethane on it, closed the door and left it to dry for the required time.
When I opened the door I saw this:
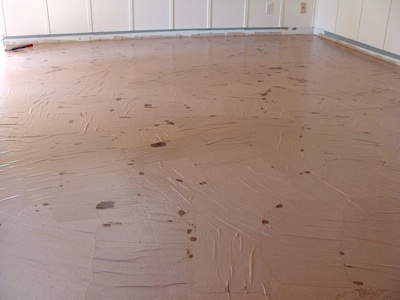
And gasped, “Oh no!” Maybe I screamed it. I don’t know, but I do know it wasn’t a happy sound.

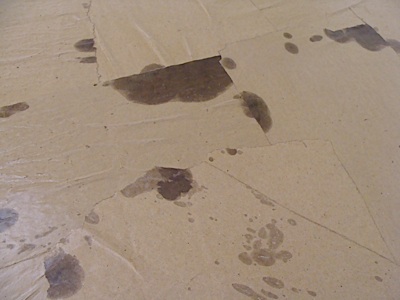
Oh, and in case you’re wondering – no, greasy spots are NOT supposed to be a part of the “leather-like” look.

How could this happen when I’ve done it so many times before?
I’m afraid to say it’s frugality gone awry. I thought the only reason I recommended water-based polyurethane in the video we did explaining how to do this flooring technique was because it dried fast.
When I went to the store to buy the items for this bedroom, I noticed that oil-based poly was now “fast drying” with only a 4-hour wait between coats. I could still get this done in one day and…here’s the clincher…
It was $15 dollars cheaper.
So, now we know there is another reason beside fast-drying time to use water-based polyurethane:
Paper and oil do not mix.
I should mention I learned one more reason to never use oil-based poly again (as if I needed another!)- the smell was so bad that it gave me a headache within the first 5 minutes of opening the can. I wish I was kidding. Then the smell wafted throughout the whole house and lingered for days.
And that was just with the one coat. Not worth it for me.
What did I do? Well, I did cry a bit- just at the thought of another 7 hours of gluing work that I thought was behind me. They were just tears of frustration. Ugh.

Then I started tearing up the paper. I thought I’d just get the greasy spots, as I didn’t want them showing through, but it was also still really wrinkled (it takes a good week for all the wrinkles to ease), so I needed to get those up as well. Then Brian sanded the whole thing with a palm sander to make sure any remaining oil poly would take the new glue.
I started tearing thinking it would take me a couple hours…eight hours later I was ready for Brian to sand. And that was with my daughter helping some. *sigh*

After another 7 hours gluing more paper down (my kids helped me tear and crumple the paper, bless them) this is the floor we now have.

Problem is- it doesn’t look anything like what we’re used to.
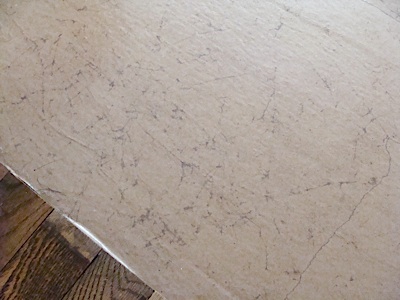
It doesn’t have that cool “texture-y” look the other floors have (this is a picture of our son’s room floor at the threshold to illustrate) that came from crumpling the paper.
And the color- sheesh, it looked more like Bandaids or plastic bags than leather. I kept waiting for it to dry more and see the look come through.
But it didn’t.
The only thing I can figure out is that I noticed that the paper seemed thicker than the last time I did this (a year ago). It didn’t tear as easily and was harder to get the rounded corners I prefer. The thicker paper must not soak up the glue/poly in the same way that creates that great mottled look that helps it look like leather.
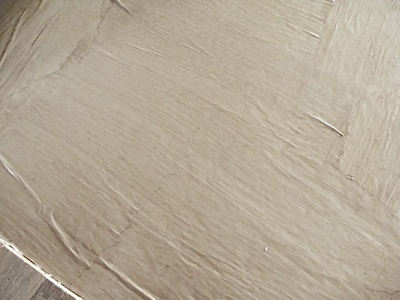
So now I’ve brushed another coat of poly on top that I tinted with some walnut colored stain we had in the garage. And while it looks like paint brushed on, it’s actually better than before (which I didn’t get a picture of- it’s too hard to see in a photo- you’ll have to trust me on this).
I think with rugs and furniture, I’ll be able to live with it- but it doesn’t help that it’s right across the hall from two rooms that turned out much better.
In the end, my two-day project turned in to a 6 day ordeal – with our bedroom furniture stashed all through the house and us taking over our son’s bed (lucky he’s at camp most of the time).
And the cost? I had to buy more glue, more paper (the room needed slightly more than half a roll- so now I’ve got a LOT of brown craft paper left over from the second roll), and of course the water-based poly. My “saving” us $15 has now cost us an extra $57. *gah*
The (hard) lesson seems to be, stick with what you know works (learn from me, folks!), and find thin enough paper to get a good, mottled look.
Has anyone else experienced DIY issues like this “frugality gone wrong?” Please tell me I’m not the only one.
-Jami
omg Just did my basement floor with brown paper and lepage glue. Used half water half glue. Its now bubbling up. Its been 2 days and the big ripples dont seem to be going away. what do I do? I have read that it takes up to a week for the ripples to flatten out? I want to put varathan over it but Im afraid to. I think those ripples in the paper will tear if I varathan it and then move furniture in the room. I am so disappointed. I did a practice test on a piece of plywood and that didn’t happen on the test. Any suggestions? Also I purchased a J Tool. Which is like a roller with a hard surface simular to a rolling pin. I thought maybe if I wet the surface I could roll out the wrinkles and raised areas. I was really careful to make sure the surfaces were flat when I glued them down. PLEASE HELP!
Sorry! To me it sounds like your water-to-glue ratio was too much water, not sure why your test didn’t show that. Is your basement floor plywood? If they are really big ripples, you won’t want to leave them. I’d use a putty knife to scrape up any big ripples and then apply a new piece of paper over the areas using 2/3 glue to 1/3 water ratio.
I was just wondering can you use the paper bag method on doors??
People have used this technique on many things, Kisla! Some of them included walls, counters and table tops. I think doors would be fun, too.
Ohh ok thank you!
I did a paper bag floor in my master bedroom. I looked at several different web sites to figure out the best way to do it. I had already purchased everything i was going to need to complete it and was really excited to get started. I glued all the paper down and let it dry overnight. The next morning i was ready for polyurethane but wanted to take one last look at how you did your floor and thats when i came across your situation with oil based poly. I panicked since i had gotten oil based poly to save money. I sat and thought about what i was going to do. I did a test and it left big brown spots! Oh no! So i did another test with a can of water based poly i had left from a different project. I thought maybe if i sealed it with a coat of water based then put on my oil based maybe it wouldn’t leave spots and it worked. So i ended up doing two coats of water based poly on my floor and 3 coats of oil based on top of that and it looks amazing! There are two places where i had a little brown spot show through but i can live with that. Thank you for saving me by sharing your experience!
Oh, I’m so glad April! And that’s good to know that you can do the more inexpensive oil poly over the top of water-based – good solution.
Jami, have you ever heard of anyone using this technique on a concrete floor that’s on a screened porch? My porch gets a little snow on it during the winter, and during summer storm, some rain will blow in–not enough to soak the wicker furniture, but it’s not waterproof by a long shot.
I know you’re going to say, “All you can do is try it.” But since you’re the paper bag floor guru, I wonder if you have any anecdotal information about it being used on a covered, but exposed, area.
Thanks for your help!
Check out my paper floor Q&A, Charlotte – I answer the question about cement floors there with a link to a site that did it successfully. As for the fact that it’s a screened porch, as long as it’s coated in the poly good, I think it would work!
Hi Jami…I am in the middle of doing a table (just wanted to see if I could do something small before I attempt the study) and I’ve noticed the air pockets (albeit small pockets). is this going to be a problem? I have tried to use a paintbrush to get them out, however there are still some there. my bag pieces are smaller, perhaps 3×4, – 4×6 pieces. any advice?
Thanks so very much for helping me!
Jean
My experience, Jean, is that the wrinkles subside after a week or more of drying. They are less with the glue layer, reappear with the poly layers and then when it’s fully cured after a week or so, they aren’t as noticeable. There are still a few here and there – maybe they stand out more on a table top? (good idea, btw, to start with a smaller test area!)
5 Hi Jami…. first let me say thank you so much for your tutorials on the floor I’ve been researching and reading about the paper bag floors for over 5 months. I recently did my sons room and I decided to do a plank style finish. The floor I was laying on top of was a hard wood floor….. the gluing process went fine…. although it took me 5 hours…. How ever when I applied my stain Main wax Gunstock…. I got several very large noticeable oil botches. The weird thing. …is they did not appear at first…. it was only after a hour of me applying the finish. I did a sample board prior to doing the floor……..no problem. Do you have any suggestion on how to fix the blotches without ripping up the entire floor? ????? ?? I was thinking about just taking up the pieces that are heavily blocthed……….I don’t know. Any suggestions would be helpful. Thank you in advance for your time and consideration.
Shay☺
As you can see from this post, Shay, I haven’t had good luck with oil based products on the paper floor. I know others stain it with oil based, but I would only use water based, since this blotching problem has caused be heartache. 🙁 That said, if I were you, I’d just remove the areas you don’t like and try again- crossing fingers it works. 🙂 Weird that it only showed later…
It took days to find someone who had the same problem I just had – those ugly brown spots and finally I found this page and the reason why — thankfully I was only doing a small shelf as practice before I tackled the floor, so have a chance to rip it off and start over. Thanks so much for putting your mistake out there for all to see so we can fix our own mistakes. Very grateful
Glad you found this answered your question, Carol – and SO happy to know you did a test area, which is what I always suggest. 🙂
I saw all the videos, and articles, and couldn’t wait to try.. Did one room, thought it was going to look great.. applied the first coat of water based poly, and have a huge blushing problem.. I tried the denatured alcohol, which just seemed to make it more white.. We live in a much more humid climate.. What do I do now? sigh.
By blushing problem, you mean the poly is drying white? I’ve never had that happen – have you contacted the manufacturer help line? Sorry I can’t be of more help! 🙁
It didn’t do it all over, just in spots.. You mean the Polly manufacturer? Maybe that’s the problem.. Maybe it’s the wrong kind of water based Polly.. Do you recommend a brand?
Thanks! Chrissie
Well, I more meant if the poly manufacturer had a help line and they could give you any ideas on why you’ve got the spots and if there’s a way to get them out. I’m not brand loyal, we’ve used both Minwax’s poly and Varathane brands with good outcomes. Sorry you’re dealing with that, Chrissie!
I was all set to do this with oil based poly because i figured it would be more durable. I have ripped the old nasty carpet out of my house because I could not deal with four boys a dog and mud anymore. I am excited to do this in my living room but am wondering if I can do it in patches to allow for walking spaces in the main parts of my house.
Lots of people have, Kristian, so you can. Sometimes there’s a difference in where you stopped and started (who knows why?), so be aware of that – maybe you can build it into the design (like stop with a curved edge instead of straight, etc.). And yes, I do not recommend oil based poly, obviously. 😉
I really, really want to do this flooring in my living room, dining room, and bedrooms. I was wondering what would happen if I used two different color stains on the floor. Maybe a red tone and then a dark brown over that? Or would that be too much saturation ???
I always suggest doing a test, either on a hidden part of the floor or a piece of plywood or subfloor. Let us know how this works!
I am going to try this in my bedroom, its concrete already because I hated the stinky carpet. Anyway I was going to buy Kraft paper because I can get it in huge rolls for 20 bucks (thought is to do the whole house) but what weight would you buy? From what I read you feel lighter weight paper is better. Kraft paper comes in lightweight, medium and heavy. I was thinking of going with the medium. Thoughts on this??
I’m not that familiar with the weights of paper, but medium sounds right to me, too, Crystal. The paper I’ve used successfully without this problem was definitely not light weight, or it would’ve torn with the glue/water application, and I found here that a heavy paper didn’t soak up the solution enough to leave the cool lines that give the treatment it’s leather-look. I’d go with medium, too. Oh, and if you’re doing concrete, make sure to read the FAQ page for tips from people who’ve successfully applied it on concrete!
I did mine on concrete with a 50/50 all purpose elmers glue and water and it worked out great!
Jett, I know concrete is porous and if putting down wood flooring, you have to use a water barrier (underlayment) first. How does the finished paper floor act as far as moisture goes, etc? My concrete floor is a slab, so I’m worried about what may happen once I apply the paper treatment. Do you have any problems with it a year+ down the road?
Hi, I found some Kraft paper at Michaels craft store. But it has a slight texture on one side. Is this typical and if not, will it still work??
**new homeowner on a budget**
Not sure, Katrina, without seeing it – my suggestion is always to do a test area (or on a separate piece of wood) to see what it looks like and if you like it. 🙂
It will work on either side of the paper. If you want it to be uniform you pick one side of the paper and continue to use the same side up. You will need to take a pencil and lightly make squiggly lines down the opposite (bottom) side you chose not to use. Before you start cutting or tearing your pieces roll out long sections and make the lines 3-4 inches apart or less of you make larger squiggly lines. The penciled lines will not show up through your flooring but you will be able to see what side you’re working with even through the glue. This will allow you do know what side is down and what side is up!
Hope this helps!
Help, 5th time trying to do my counter top. Every time I add the minwax stain it leaves oil blotches all over, it looks awful. All the blogs I read say use oil stain. Yet as you say oil and paper don’t mix. What in the world am I doing wrong? I will assume that the glue water mix is not forming a barrier. Should I add less water to the glue so that it makes it thicker?
A solid week of trying this to no avail, please help!!!!
I haven’t used the stain on any yet, but from what I’ve read, you have to embrace the blotches. I think it’s not noticeable as much on floors and with a darker stain – rugs and furniture covers so much of the square footage. Sorry I can’t be more help. 🙁
Jami, My wife and I just bought a roll of Reeves builders paper from Menards that the saleman said was the “same ” thing as Kraft paper. We are getting ready to try your floor idea but now we do not know if we purchased the correct paper. Please let me know if there is a difference between the two papers. Love the floor idea and would like to make it look like yours !
Thanks
JOE
Yes, Joe, I have used builder’s paper, too, but wonder if it’s not consistent, since it was so different for our bedroom floor than it was for our kids floors. My advice is to to a test, either in a closet or on a piece of scrap plywood or something like that. That’s about the only way to really see what it will look like – before you’ve lost a whole weekend to the project. 🙂
I ran into a problem of inconsistent builders paper as well! I bought my first roll and did my guest bedroom and it turned out AMAZING! Then I decided to do my master bedroom, I used the same roll as I did the guest bedroom but ran out with a 5X5 patch left. I went back to the same store bought the exact same brand of paper and finished, and the paper had dried a completely different color. I’m now stuck with the decision to try to make it work and layer more of the new stuff over my old stuff, or start completely over. I’m not sure how it will look if I completely layer over the existing brown paper floor. So my recommendation is if you know you have a large room that will take more than 1 roll, mix up the paper from the 2 rolls as you go.
Oh thanks for taking the time to leave your tips, Sarah! That’s so helpful for future projects. 🙂
I’m in the middle of doing a floor. My problem is I could only do one side at a time and now there is a dark line down the middle of the room. Any ideas of what I can do about that? The room is my studio which is open to the public so I’d like it to look good.
Ugh, yes, that can happen when one part dries before the other and I’ve no idea why. 🙁 I would add some paper randomly to try and blend the line – kinda in a zig-zag pattern. Does that make sense?
Yep, Jojo- Home Depot.
Did you get the paper at the same place as before?
If only I knew if my projects were going to be headaches or winners BEFORE I start them! I guess we can thank you for ironing out all the bugs so we don’t have to??
Cheapy me didn’t even want to pay full price for something as small as a can of spray paint–I used the knock-off brand, only to have it gunk up and streak and leak all over me–still had to go back and buy the brand name to finish my project, and the clean-up was twice as long and twice as hard. Not worth it for something so small.
Oh how awful!!! I got some advice one day as I was lamenting the fact that I didn’t have enough of my choc brown paint left to do the bathroom. I was told to mix the few colours I had and it would turn a great shade of brown. It. Was. awful. Next time we’ll pay for new paint!
Me too encountered a problem with my bedroom paper floor and I just share one tip. Always remember that you should repair the loose spots before installing a new floor covering.