
Master Bedroom Paper Floor Problem
In Monday’s post, I alluded to an issue I had last week that involved gluing, crying, tearing, and gluing again. And then I left you hanging.
Not very nice of me. I’m sure that some of you have been up at night just wondering what on earth happened.
Well, you can rest easy tonight. Here’s the whole story:
After spending 7 hours gluing the torn brown paper to the floor of our master bedroom – just like I did in our last house, our son’s bedroom floor, and our daughter’s bedroom floor (which then got featured in Cottages and Bungalows magazine!) – I put the first coat of polyurethane on it, closed the door and left it to dry for the required time.
When I opened the door I saw this:
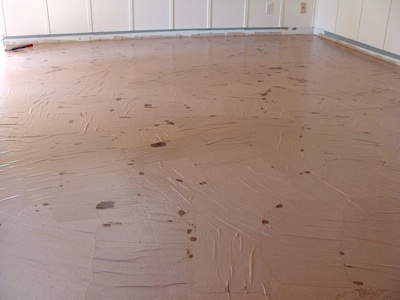
And gasped, “Oh no!” Maybe I screamed it. I don’t know, but I do know it wasn’t a happy sound.

Oh, and in case you’re wondering – no, greasy spots are NOT supposed to be a part of the “leather-like” look.

How could this happen when I’ve done it so many times before?
I’m afraid to say it’s frugality gone awry. I thought the only reason I recommended water-based polyurethane in the video we did explaining how to do this flooring technique was because it dried fast.
When I went to the store to buy the items for this bedroom, I noticed that oil-based poly was now “fast drying” with only a 4-hour wait between coats. I could still get this done in one day and…here’s the clincher…
It was $15 dollars cheaper.
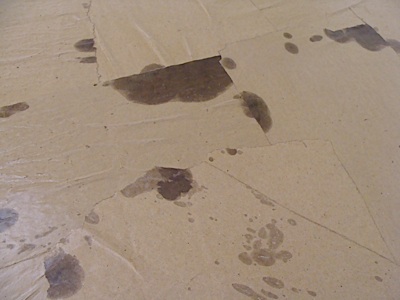
So, now we know there is another reason beside fast-drying time to use water-based polyurethane:
Paper and oil do not mix.
I should mention I learned one more reason to never use oil-based poly again (as if I needed another!)- the smell was so bad that it gave me a headache within the first 5 minutes of opening the can. I wish I was kidding. Then the smell wafted throughout the whole house and lingered for days.
And that was just with the one coat. Not worth it for me.
What did I do? Well, I did cry a bit- just at the thought of another 7 hours of gluing work that I thought was behind me. They were just tears of frustration. Ugh.

Then I started tearing up the paper. I thought I’d just get the greasy spots, as I didn’t want them showing through, but it was also still really wrinkled (it takes a good week for all the wrinkles to ease), so I needed to get those up as well. Then Brian sanded the whole thing with a palm sander to make sure any remaining oil poly would take the new glue.
I started tearing thinking it would take me a couple hours…eight hours later I was ready for Brian to sand. And that was with my daughter helping some. *sigh*

After another 7 hours gluing more paper down (my kids helped me tear and crumple the paper, bless them) this is the floor we now have.

Problem is- it doesn’t look anything like what we’re used to.
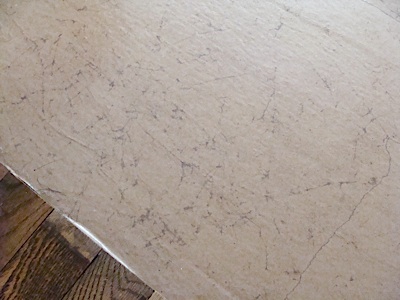
It doesn’t have that cool “texture-y” look the other floors have (this is a picture of our son’s room floor at the threshold to illustrate) that came from crumpling the paper.
And the color- sheesh, it looked more like Bandaids or plastic bags than leather. I kept waiting for it to dry more and see the look come through.
But it didn’t.
The only thing I can figure out is that I noticed that the paper seemed thicker than the last time I did this (a year ago). It didn’t tear as easily and was harder to get the rounded corners I prefer. The thicker paper must not soak up the glue/poly in the same way that creates that great mottled look that helps it look like leather.
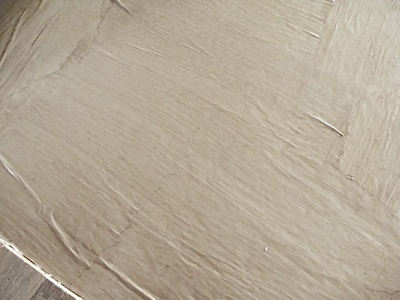
So now I’ve brushed another coat of poly on top that I tinted with some walnut colored stain we had in the garage. And while it looks like paint brushed on, it’s actually better than before (which I didn’t get a picture of- it’s too hard to see in a photo- you’ll have to trust me on this).
I think with rugs and furniture, I’ll be able to live with it- but it doesn’t help that it’s right across the hall from two rooms that turned out much better.
In the end, my two-day project turned in to a 6 day ordeal – with our bedroom furniture stashed all through the house and us taking over our son’s bed (lucky he’s at camp most of the time).
And the cost? I had to buy more glue, more paper (the room needed slightly more than half a roll- so now I’ve got a LOT of brown craft paper left over from the second roll), and of course the water-based poly. My “saving” us $15 has now cost us an extra $57. *gah*
The (hard) lesson seems to be, stick with what you know works (learn from me, folks!), and find thin enough paper to get a good, mottled look.
Has anyone else experienced DIY issues like this “frugality gone wrong?” Please tell me I’m not the only one.
-Jami

Hey there! I was wondering if you might have any advice for repair. I have purchased a home with a paper floor, but it looks like they did not use enough poly to protect it. Under the washer and in a few other areas it is discolored and has a few tears all the way down to the old linoleum. We found a bucket of oil based poly we thought they must have used on the floor. Tried to dunk a piece of paper into the poly and just pasting it on top, but it wouldn’t stick at all. Just kept crumpling up.
Don’t suppose you might have any advice/ideas?
Hmmm, well I wouldn’t have used this in an area with a washer, but that’s just me. 🙂
And obviously wouldn’t have used oil based since that leaves oil marks on the paper.
Here’s how I patch areas: crumple new pieces of paper; brush water based poly over the areas you need to cover (go wider than discolored or worn areas to be sure); smooth paper over poly and then brush more poly over the top of the new pieces. If the pieces move too much, let them dry first before coating the tops with poly. Let dry and then add more layers of poly as you see fit to form a good top, drying between each according to the directions on the poly.
Here is a problem I encountered with laying down a brown paper bag floor in an entire house. Maybe you can help me figure out why this is happening? The house where I used the paper bags has several different types of floors. The living room was partially ceramic tile and part linoleum. Part of the house had a concrete floor and some rooms had wood. The person who helped me prepare the floors prior to installation used a quick drying concrete product similar to Quikrete to patch holes and level spots. He mixed it correctly and it was smooth and dry before we began the installation. About two weeks after we finished the paper bag floor, several spots began to dry out and rip holes everywhere he used the concrete product. What is strange is that it turned back into dry concrete dust piles under the bag floor. So we are getting holes with deep piles of concrete dust. Any ideas on why this is happening?
Sorry, I don’t have any experience with that type of flooring or the concrete mix, so I can’t help you. I’ve only ever applied this to plywood, fiberboard, and OSB.
I tried this in my kitchen, luckily I only did a small section but it didn’t stick in alot of places and there’s no wrinkles when it dried..